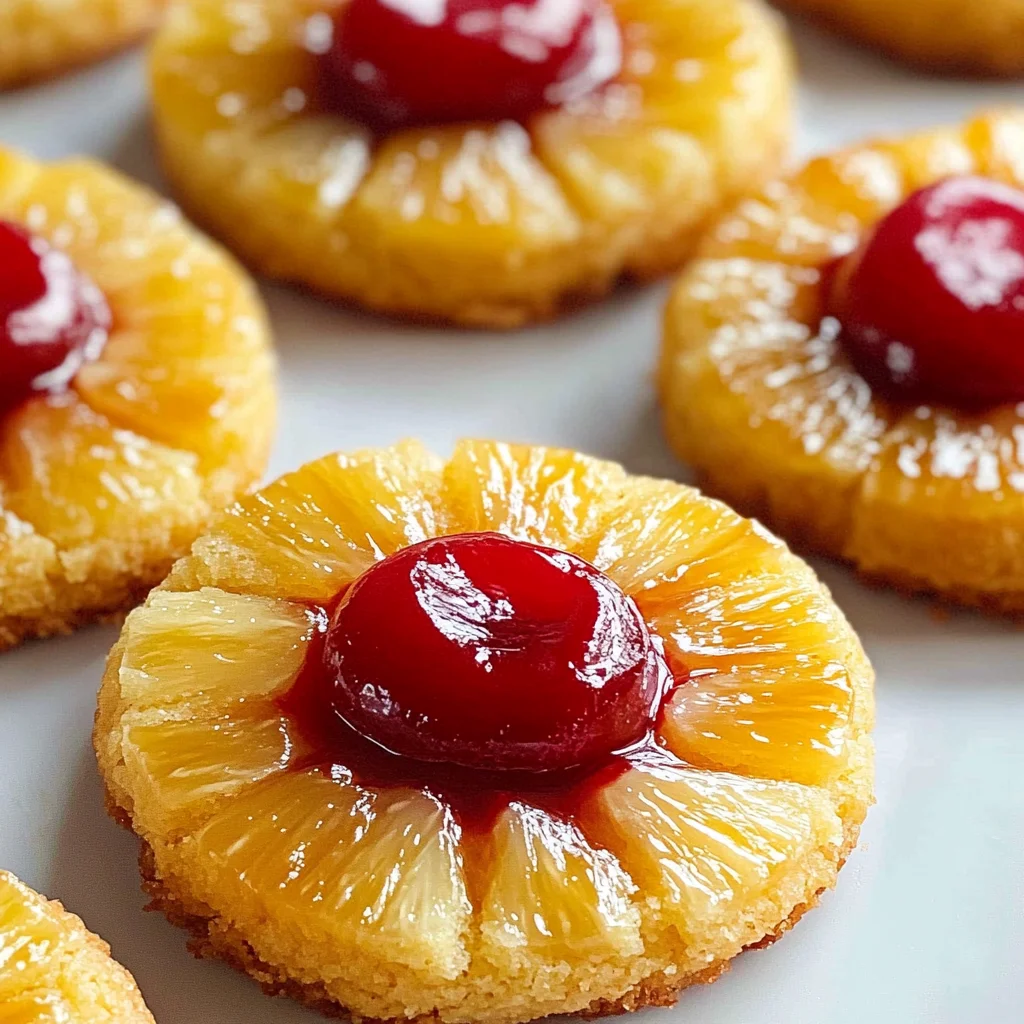
Pineapple Upside-Down Cookies: A Fun Twist on a Classic Dessert
There’s something profoundly satisfying about baking, isn’t there? It’s like alchemy—transforming simple, humble ingredients into something utterly extraordinary. When you take that first bite of a warm cookie, bursting with flavors and textures, it’s as if you’ve unlocked a treasure chest of memories, comfort, and joy. Today, I’m beyond excited to share a delightful recipe with you that perfectly encapsulates this feeling: Pineapple Upside-Down Cookies. Think of it as the playful cousin of the classic Pineapple Upside-Down Cake we all adore. These cookies are soft, chewy, and full of that tropical charm we crave during those sunny days. They’ll transport you straight to a beachside paradise with every bite!
Every time I whip up a batch of these cookies, it feels like I’m celebrating summer itself. The buttery goodness combined with the sweet caramelized pineapple and a cherry on top creates a symphony of flavors that dances on your palate. You know those moments when you’re enjoying something so delicious that you can’t help but smile? That’s what these cookies do for me! They’re perfect for gatherings—whether it’s a backyard BBQ or just a cozy afternoon tea with friends. And trust me; they disappear faster than you can say “Pineapple Upside-Down Cookies.” So let’s dive into this adventure together!
Pineapple Upside-Down Cookies: A Fun Twist on a Classic Dessert
Welcome to the wonderful world of Pineapple Upside-Down Cookies! Get ready to embark on an exciting culinary journey where we reimagine a beloved classic dessert into delightful handheld treats. With their chewy texture, bright tropical flavor, and that irresistible cherry on top, these cookies are bound to become your new favorite indulgence. Let’s gather our ingredients and get started on this delicious adventure!
Ingredients:
As we set out on this baking escapade, let’s take a moment to appreciate each ingredient’s role in crafting our Pineapple Upside-Down Cookies. Every single one contributes to the magic we’re about to create.
- ½ cup (1 stick or 113g) unsalted butter, softened – This ingredient is the backbone of our cookies, providing that rich, buttery flavor and tender texture we all crave in baked goods. Softened butter allows for easy creaming with sugar, which is crucial for achieving that light and fluffy consistency we’re aiming for. If you’re using salted butter instead, just be sure to reduce the added salt in the recipe to maintain balance.
- ¾ cup granulated sugar – This sweet addition does more than just make our cookies taste good; it also influences their structure by creating tenderness within their chewy framework. For those who prefer a deeper flavor profile reminiscent of caramel notes, feel free to swap in brown sugar here—it will add another layer of complexity to our treat.
- 1 large egg – Acting as the glue that holds everything together, this egg not only binds our ingredients but also adds moisture which is crucial for achieving that lovely chewiness in each bite. If you need an egg alternative due to allergies or dietary preferences, don’t worry! A flax egg made from 1 tablespoon ground flaxseed mixed with 3 tablespoons water will work beautifully.
- 1 teaspoon vanilla extract – This isn’t just any flavoring; vanilla is like a warm hug in cookie form! It enhances sweetness while adding those beautiful aromatic notes that elevate our Pineapple Upside-Down Cookies from ordinary to extraordinary.
- 1 ¼ cups all-purpose flour – Flour provides structure and stability; without it, we’d have flat puddles instead of delightful cookies! If gluten is an issue for you or someone you know, consider using a 1:1 gluten-free flour blend which will give similar results without sacrificing taste.
- ½ teaspoon baking powder – A little leavening agent goes a long way! Baking powder helps our cookies rise slightly during baking while ensuring they remain soft rather than dense. If your baking powder is old or expired (check that date!), now might be the perfect time to grab some fresh!
- ¼ teaspoon salt – Balancing out sweetness is absolutely paramount when it comes to baking; salt enhances flavors and brings all the elements together harmoniously.
- ½ cup brown sugar – This ingredient is key in creating that signature upside-down effect we love so much! When caramelized during baking along with melted butter beneath it, brown sugar transforms into liquid gold—richly flavored syrupy goodness waiting underneath every cookie!
- 2 tablespoons melted butter – This additional melted butter combines beautifully with our brown sugar base, contributing richness while helping create that caramelized glory at the bottom of each cookie.
- 1 small can pineapple rings (cut into smaller pieces) – It wouldn’t be a proper Pineapple Upside-Down Cookie without its star fruit! The juicy morsels infuse each bite with tropical delight. Fresh pineapple works just as well—just remember to chop it into tiny tidbits for even baking!
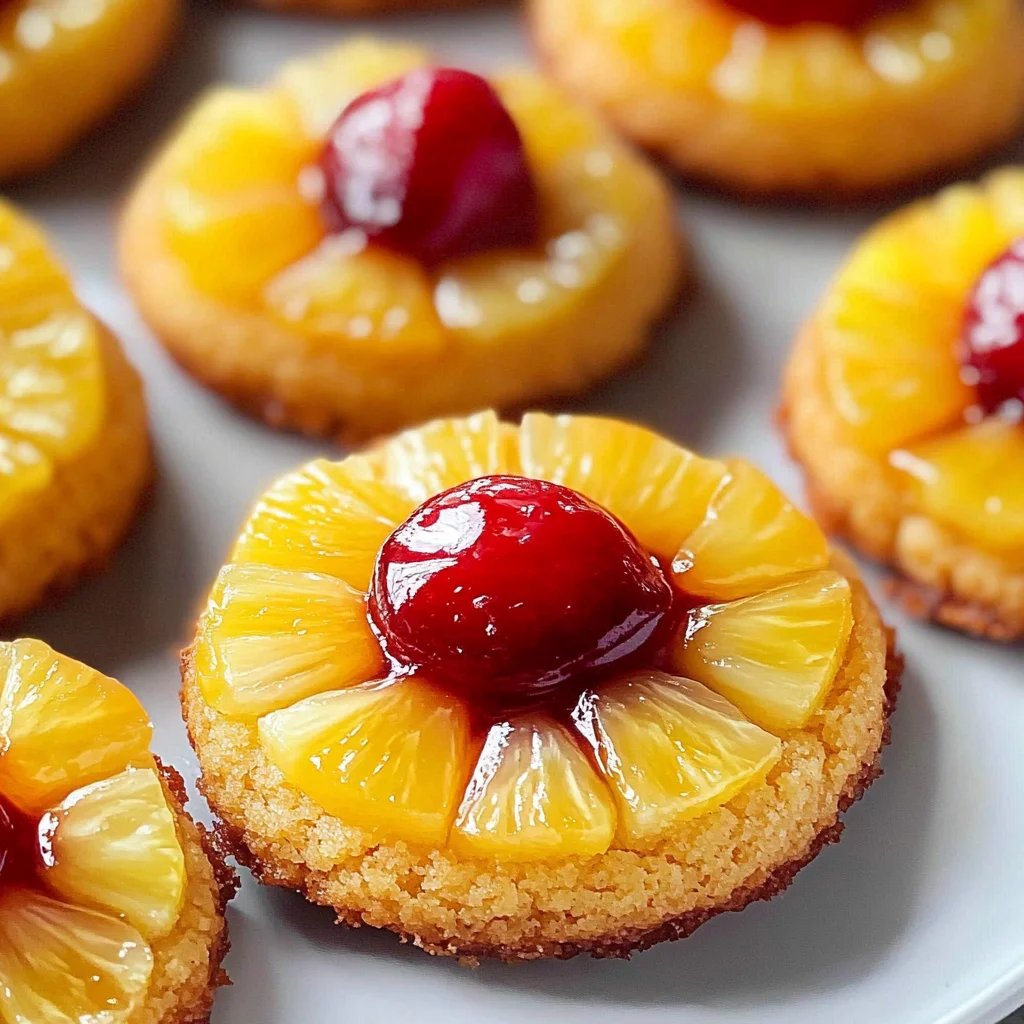
- Maraschino cherries (halved) – These little gems add not only sweetness but also visual appeal—a bright pop of color atop each cookie makes for an irresistible presentation. If maraschino cherries aren’t available or preferred, feel free to substitute them with fresh cherries or dried cranberries.
Equipment You’ll Need:
Before we dive into mixing and measuring our way toward cookie perfection, let’s take stock of the essential tools we’ll need in our kitchen arsenal today. Having the right equipment makes all the difference between an enjoyable experience and one filled with frustration!
- Mixing bowl – A sturdy mixing bowl is where all the magic begins! Choose one large enough to comfortably mix together your ingredients without fear of overflow—glass or stainless steel are great options here because they won’t react negatively with any ingredients.
- Electric mixer (stand or hand) – Though mixing by hand is certainly possible (and sometimes rewarding!), an electric mixer speeds things up significantly—especially when creaming butter and sugar together until fluffy and light—a non-negotiable step in making these cookies truly scrumptious!
- Measuring cups and spoons – Accurate measurements are key in baking; precision matters here more than ever! Invest in reliable measuring tools so your ratios are spot-on every time—you’ll thank yourself later when those cookies turn out perfectly!
- Spatula – A flexible spatula helps scrape down sides of bowls efficiently while folding dry ingredients gently without deflating air bubbles created during creaming—the secret weapon for achieving perfectly textured cookies.
Now that we have everything lined up nicely—ready your oven because we’re about to start crafting these delectable Pineapple Upside-Down Cookies: A Fun Twist on a Classic Dessert!
Step 1: Creaming Butter and Sugar Together
To kick things off right, let’s begin by preheating your oven to 350°F (175°C). While it warms up—and trust me; waiting will only build anticipation—we can tackle one of my favorite steps: creaming together our softened unsalted butter and granulated sugar until they form an airy mixture reminiscent of clouds! This process is known as creaming—the goal here is simple yet crucial: incorporating air into the fat through vigorous mixing creates lightness throughout our cookies.
In your mixing bowl (preferably using an electric mixer), combine ½ cup softened unsalted butter with ¾ cup granulated sugar. Start on low speed until combined then gradually increase speed until light and fluffy—this should take about 2 minutes! You’ll know you’ve achieved success when everything appears pale yellow in color—a sign those air pockets are forming beautifully within your batter. Don’t rush this step; it may feel tedious at times but trust me—it lays down strong foundations for amazing texture later on!
Step 2: Adding Egg & Vanilla
Next up? Let’s add some personality (and moisture!) into our mixture by introducing one large egg along with one teaspoon vanilla extract! Gently beat them together before adding them straight into your creamy concoction—it’ll help disperse evenly throughout all components ensuring no clumps remain behind.
Mix again at medium speed until fully combined—about another minute should do here! Now pause briefly—take note how different everything looks compared before; smoother yet still thick enough not too runny—that means progress is happening nicely thus far!
Step 3: Incorporating Dry Ingredients
Time now for some serious structural support—let’s sift together our dry ingredients: 1¼ cups all-purpose flour mixed alongside half teaspoon baking powder plus quarter teaspoon salt directly over wet mixture already waiting patiently below us inside bowl(s). Sifting ensures no lumps remain while also aerating flour allowing even distribution once mixed later—it might seem like extra work but truly worth every effort when striving perfection!
Now carefully fold dry mix using your spatula—this gentle technique avoids overworking dough leading toward tough results down line which would be tragic since we want soft chewy textures here instead… So keep loading up spatula then turning back towards center slowly until no visible streaks appear remaining within batter itself—that takes around thirty seconds max if done properly though might vary depending upon how diligent were earlier steps taken thus far…
Step 4: Preparing Topping & Baking
With dough complete now comes exciting part—the assembly process begins! Grab yourself another small bowl where we’ll prepare mouthwatering topping meant honorably represent signature upside-down beauty we’ve come accustomed seeing cakes alike over years gone past… Combine half cup brown sugar along two tablespoons melted butter whisking gently till smooth then spread evenly across bottom lined parchment paper inside prepared sheet pan beforehand chosen above—all must be evenly coated so syrupy goodness seeps through cookie layers seamlessly enhancing flavors altogether during bake itself thereafter…
Now sprinkle chopped pineapple pieces generously atop luscious brown-sugar-butter layer followed swiftly afterward halved maraschino cherries placed strategically amongst fruits scattered around neatly forming patterns desired visually pleasing aesthetic—we eat first through eyes after all right?
Once assembled appropriately pop tray inside oven allowing heavenly scents fill home surroundings whilst bakes away roughly fifteen minutes maximum watch closely since edges will become golden brown indicating readiness soon approaching… What happens next? Anticipation builds excitement within hearts knowing delicious treats await after cooling period concludes shortly thereafter enjoy blissfully indulging each bite fully embracing nostalgia wrapped around joyful moments shared amongst loved ones gathered ’round shared table celebrating life through food made lovingly crafted hands involved therein…
Stay tuned—we’ll cover further steps shortly diving deeper exploring intricacies behind these delectable creations awaiting final touches completing masterpiece soon enough savor every last crumb left behind once savored completely empty plates tell story itself…
Step 5: Creaming the Butter and Sugar to Perfection
Now, let’s dive into one of the most crucial steps in creating these delightful Pineapple Upside-Down Cookies: creaming the butter and sugar. Start by placing your softened unsalted butter into a mixing bowl, followed by the granulated sugar. Using a hand mixer or a stand mixer fitted with a paddle attachment, begin mixing on medium speed. This step is absolutely paramount because it incorporates air into the batter, which will help your cookies achieve that soft, tender texture we all adore. You want to beat this mixture until it becomes light and fluffy—this usually takes about 2 to 3 minutes. Don’t rush this step! The fluffiness of your mixture will directly affect the overall rise and delicate crumb of your cookies.
As you mix, take a moment to enjoy the sweet aroma wafting from the bowl; it’s like a promise of tropical goodness in every scoop! You’ll notice that the color will lighten as you blend—the transition from yellow butter to a pale cream is a great visual cue that you’re on the right track. Once it reaches that fluffy stage, add in your large egg and vanilla extract. Mix just until combined. This addition not only adds moisture but also acts as a binding agent, helping everything hold together beautifully. Keep an eye on that consistency—if it looks too runny or too thick, don’t hesitate to adjust with a little extra flour or sugar as needed.
Step 6: Sifting Together Dry Ingredients for Balance
Next up is sifting together our dry ingredients: all-purpose flour, baking powder, and salt. This process is crucial for ensuring that your dry ingredients are well-combined and free from clumps; trust me, no one wants any rogue lumps in their cookies! In a separate bowl, whisk together 1¼ cups of all-purpose flour with ½ teaspoon of baking powder and ¼ teaspoon of salt until they’re thoroughly mixed. The baking powder is what gives these cookies their lovely rise and airy quality while balancing out the sweetness with just the right amount of salt enhances all those flavors. This balance is key for achieving that perfectly harmonious taste profile—sweet but not overwhelmingly so.
After you’ve sifted it all together (and I encourage you to take a moment to admire how lovely and fluffy that flour looks), gradually add this mixture into your creamed butter and sugar blend while mixing on low speed. This ensures that everything combines evenly without overworking the dough—overmixing can lead to tough cookies, which is something we definitely want to avoid! As you mix, watch for that beautiful transformation as everything comes together into a cohesive dough. It should be soft but not overly sticky; if it feels too wet, you might need to incorporate an extra tablespoon or two of flour.
Step 7: Preparing Your Pineapple Base
Now we’re moving on to one of my favorite parts—preparing our pineapple base! Grab your small can of pineapple rings (or fresh pineapple if you’re feeling adventurous!) and chop them into smaller pieces if needed; approximately one-inch chunks work beautifully here. This fruit will not only contribute its tropical flavor but also become gloriously caramelized in the oven, lending depth and richness to our cookies. In another small bowl or saucepan over low heat, melt 2 tablespoons of unsalted butter along with ½ cup of brown sugar until they form a luscious syrupy mix—think liquid gold!
This step is essential for creating that signature upside-down effect when these cookies bake up; it’s where the magic happens! Once melted together, pour this dreamy concoction directly into your prepared baking dish or onto parchment paper lined cookie trays in even portions—this is where each cookie gets its own little caramel pool! Don’t worry about spreading it around too much; as they bake, the syrup will naturally spread under each cookie base, ensuring everyone gets their fair share of that sweet goodness.
Step 8: Assembling Your Cookies with Love
Now comes the fun part—assembling our Pineapple Upside-Down Cookies! Preheat your oven to 350°F (175°C) if you haven’t already done so because we want everything warm and cozy when they hit those hot baking sheets! With clean hands or using a cookie scoop (which I highly recommend for uniformity), scoop out generous tablespoons of dough and carefully place them over each dollop of caramelized butter and brown sugar mixture on your baking tray. Aim for about 2 inches apart because they will spread slightly during baking; no one wants sticky cookies stuck together!
Once arranged beautifully on your tray, gently press down on each cookie just enough so they flatten slightly but still maintain some height—this helps them bake evenly without becoming too flat or crispy around the edges while keeping their delightful chewy center intact. After this exclusive gathering has been completed (and I assure you this step feels like crafting little edible treasures), pop them into your preheated oven for about 10-12 minutes or until they’re golden brown around the edges and softly set in the middle. It’s vital to keep an eye on them towards the end because oven temperatures can vary; look for those gorgeous golden edges while ensuring they retain their softness at heart.
Conclusion:
As we wrap up our delightful journey through making these Pineapple Upside-Down Cookies: A Fun Twist on a Classic Dessert, I just want to express how truly special this recipe is—both in flavor and experience. Each bite transports you straight to sunny shores with its harmonious blend of buttery sweetness from the cookies mingling with the vibrant tang of pineapple and gentle kiss of cherry on top. The textures play beautifully against one another: the softness of the cookie complements the luscious fruit topping perfectly, making every moment spent savoring these treats profoundly satisfying.
Why is this recipe such a must-try? Well, beyond its delicious taste lies an opportunity for joy—joy in baking alongside loved ones or sharing it at gatherings where laughter fills the air. Imagine pulling these cookies from your oven, their golden tops glistening under soft kitchen light as everyone gathers around, eagerly waiting for their first bite. It’s not just about indulging; it’s about creating memories that linger long after the last crumb has been devoured.
For serving suggestions, let your imagination run wild! Imagine savoring one with a steaming cup of coffee or tea as an afternoon pick-me-up; it pairs so well with creamy vanilla ice cream if you’re after something more indulgent. For breakfast (yes, breakfast!), how about crumbling one over yogurt topped with fresh fruits? You could even drizzle some coconut cream over it for extra flair! The possibilities are endless when it comes to enjoying these delightful cookies.
Feeling adventurous? This recipe is wonderfully adaptable—you can easily switch up fruits depending on the season or use different nuts to create your signature twist! How about adding diced mangoes instead of pineapple for a tropical flair or sprinkling some toasted coconut flakes atop each cookie before baking? These variations can elevate this classic recipe into something uniquely yours! So go forth and bake; don’t forget to share your creations with me—I’d love to hear all about your adventures in cookie-making!
Pineapple Upside-Down Cookies

Delight in Pineapple Upside-Down Cookies: A Fun Twist on a Classic Dessert that combines tropical flavors into handheld bliss—bake yours today!
- Prep Time: 15 minutes
- Cook Time: 12 minutes
- Total Time: 27 minutes
- Yield: About 12 cookies 1x
- Category: Dessert
- Method: Baking
- Cuisine: American
Ingredients
- ½ cup unsalted butter, softened
- ¾ cup granulated sugar
- 1 large egg
- 1 teaspoon vanilla extract
- 1 ¼ cups all-purpose flour
- ½ teaspoon baking powder
- ¼ teaspoon salt
- ½ cup brown sugar
- 2 tablespoons melted butter
- 1 small can pineapple rings (cut into smaller pieces)
- Maraschino cherries (halved)
Instructions
- Preheat your oven to 350°F (175°C).
- In a mixing bowl, cream together softened butter and granulated sugar until light and fluffy.
- Add in the egg and vanilla extract; mix until combined.
- Sift together flour, baking powder, and salt; gradually fold into the wet mixture until just combined.
- In a separate bowl, mix melted butter and brown sugar; spread evenly on parchment-lined baking sheets.
- Top with chopped pineapple pieces and halved cherries.
- Scoop dough onto the prepared topping, pressing down slightly.
- Bake for about 10-12 minutes until golden brown on edges.
Nutrition
- Serving Size: 1 serving
- Calories: 130
- Sugar: 12g
- Sodium: 50mg
- Fat: 6g
- Saturated Fat: 4g
- Unsaturated Fat: 2g
- Trans Fat: 0g
- Carbohydrates: 19g
- Fiber: <1g
- Protein: <1g
- Cholesterol: 20mg