Thin Mint Cheesecake Recipe
There’s something truly magical about a dessert that combines the nostalgia of childhood favorites with the elegance of a sophisticated cheesecake. When I think of Thin Mint Cheesecake, I’m not just thinking about a delicious treat; I’m transported back to cozy nights spent with friends, sharing stories and laughter over sweet bites that make our hearts sing. This dessert isn’t merely food; it’s an experience—a symphony of flavors that dance on your palate, starting with a rich, chewy brownie crust and seamlessly transitioning into a creamy mint-infused cheesecake layer. The excitement builds as you anticipate each forkful, where the essence of those beloved mint cookies shines through. Trust me when I say that this Thin Mint Cheesecake Recipe is not just another dessert; it’s a revelation that will leave your guests in awe and begging for seconds.
As we embark on this culinary journey together, let me assure you that every step is infused with love and attention to detail. It’s about more than just mixing ingredients; it’s about creating something beautiful and delicious from scratch. Whether you’re celebrating a special occasion or treating yourself after a long week, this cheesecake will elevate any moment into something extraordinary. So grab your apron, gather your ingredients, and let’s dive into making this decadent masterpiece that’s sure to become a cherished part of your dessert repertoire!
Thin Mint Cheesecake Recipe: A Decadent Delight for Any Occasion
Now that you’re ready to create something truly special, let’s talk about what you’ll need for this Thin Mint Cheesecake Recipe. Each ingredient plays an essential role in the final result, so understanding their purpose will help you appreciate the beauty of this dish even more.
Ingredients:
Embarking on this culinary adventure means gathering some wonderful ingredients that will come together to create magic in your kitchen. Many of these elements are staples in baking but have unique properties that contribute to the lusciousness of our cheesecake.
- 1/2 cup melted unsalted butter. The luscious liquid gold here adds richness and moisture to our brownie crust, ensuring it has just the right texture—chewy on the inside and slightly crisp on the outside. Always choose unsalted butter so you can control the saltiness of your dessert better; plus, it allows the other flavors—particularly the chocolate—to shine through without competing.
- 1/4 cup dark cocoa powder. This ingredient is absolutely paramount in developing the deep chocolate flavor that pairs so beautifully with mint. Look for high-quality cocoa powder—preferably Dutch-processed—for its richer taste and darker color, which will give our brownie base an exquisite depth that’s simply irresistible.
- 2 large eggs. Eggs are integral not only for binding everything together but also for adding moisture and structure to our brownie crust. They help create that delightful fudgy texture we all crave while providing richness that enhances overall flavor.
- 1 cup granulated sugar. Sugar does more than just sweeten; it helps achieve balance against the bitterness of cocoa powder while contributing to caramelization during baking, enhancing texture as well as flavor in our crust. You want to ensure it’s well-dissolved in your batter so you get that perfect silky smoothness.
- 1 teaspoon vanilla extract. Ahh! Vanilla—a baker’s best friend! This aromatic extract adds warmth and complexity to both our brownie base and cheesecake layers, accentuating all those lovely flavors harmoniously without overpowering them.
- 1/2 teaspoon table salt. A little pinch goes a long way! Salt is essential in baking because it enhances sweetness by balancing flavors—think of it as nature’s flavor amplifier! It also helps strengthen protein structures in baked goods, giving them better texture.
- 3/4 cup all-purpose flour. Flour provides structure to our brownie base without making it too dense; we’re aiming for a lovely chewy texture here! When measuring flour, be sure to spoon it into your measuring cup instead of packing it down—this little tip prevents us from using too much!
- 1/4 teaspoon baking powder. This leavening agent is what gives our brownie crust its subtle lift—making it wonderfully light while still maintaining its chewiness! Always check expiration dates; old baking powder won’t give us the rise we desire.
- 3/4 cup chocolate chunks. These delightful morsels melt beautifully within our brownie batter as they bake, creating pockets of gooey happiness throughout every bite. Use high-quality chocolate for maximum flavor impact; I personally adore bittersweet or semisweet varieties for their balanced sweetness!
- 1 – 8 ounce package cream cheese, softened. Softened cream cheese is vital for achieving that dreamy smooth consistency we crave in cheesecakes! Be sure it’s at room temperature before mixing—it makes blending effortless and prevents lumps from forming.
- 1/2 cup powdered sugar. Powdered sugar contributes sweetness while also helping achieve an incredibly velvety texture in our cheesecake layer—it’s like fairy dust transforming everything into something magical! Sift it if necessary to avoid any clumps before adding it in.
- 1/2 teaspoon mint extract. This ingredient brings forth the signature refreshing flavor reminiscent of those beloved mint cookies! Just be cautious—it packs quite a punch! Start small and always taste as you go until you find that perfect minty balance.
- 1 – 8 ounce container Cool Whip (thawed & divided). Cool Whip adds airiness to our cheesecake layer, giving it a lightness that’s utterly intoxicating against the rich brownie base below—a combination made in heaven! If you’re looking for alternatives or prefer homemade whipped cream instead (which I highly recommend), use heavy whipping cream and whip until stiff peaks form!
- Green gel food coloring. To add a playful touch reflecting those classic mint cookie hues—the green color not only enhances presentation but also adds joy when serving at gatherings or celebrations!
- 21 chocolate mint cookies (divided). These crunchy delights are what ties everything together—their distinct minty flavor infuses every bite while providing delightful textural contrast nestled among creamy layers!
- 1/2 cup semi-sweet chocolate chips. A must-have for drizzling over top later on—these little nuggets melt beautifully into glossy perfection when paired with heavy cream!
- 1/4 cup heavy whipping cream. This luscious liquid transforms simple chocolate chips into decadent ganache when melted together—a luxurious finish elevating both flavor profile & presentation!
- Green sprinkles: Last but certainly not least—sprinkles add whimsy & festivity atop our gorgeous creation! These tiny bits of joy offer visual appeal while providing just enough crunch against creamy textures below!

Equipment You’ll Need:
Before we dive into creating this masterpiece, let’s take a quick moment to gather some essential tools you’ll need along the way—a well-equipped kitchen makes all things smoother and more enjoyable!
- 9-inch springform pan: This magical tool allows us easy access when removing delicate desserts like cheesecakes without damaging their shape or beauty as we release them from their molds! It’s especially crucial here since we’ll be layering two different textures—a sturdy yet removable option is key!
- Mixing bowls (various sizes): Having multiple mixing bowls at hand makes organization easier throughout preparation stages—from combining dry ingredients separately before adding wet ones—to mixing up different components like ganache later on—it keeps things orderly & efficient!
- Electric mixer (handheld or stand): Using an electric mixer simplifies beating together ingredients like eggs & sugar quickly without breaking too much sweat—you’ll achieve creamy perfection faster than with manual methods alone!
- Spatula or wooden spoon: A versatile tool perfect for folding delicate mixtures such as whipped cream into cheesecake batter gently without deflating them too much—it helps maintain airiness which we cherish dearly!
- Piping bag (optional): If you’re feeling adventurous and want decorative flair on top later—investing in one can transform simple Cool Whip dollops into stunning presentations worth showing off at gatherings!
Now we’re ready—for what comes next is an exciting process filled with anticipation as we pave the way toward creating something utterly extraordinary—a Thin Mint Cheesecake that’ll leave lasting memories behind each delicious slice shared among loved ones!
Step 1: Preheat Your Oven and Prepare Your Pan
To kick off this journey toward decadence, preheat your oven to 350°F (175°C) — trust me when I say getting this temperature right sets us up perfectly for success ahead! While it warms up, take out your trusty 9-inch springform pan; line its bottom with parchment paper so nothing sticks during baking—and spray those sides generously with nonstick baking spray too because nobody wants a sticky situation later! This first step might seem simple but don’t rush through it—taking care now ensures smooth sailing ahead when we’re ready to pop everything inside later on.
Step 2: Create Your Brownie Base
In a medium bowl (or large if you prefer less mess!), stir together melted unsalted butter with dark cocoa powder until combined smoothly—the aroma will whisk you away already! Once blended nicely together set aside while we mix other components separately because they’ll come alive soon enough once united under one roof (or rather pan!). Next up beat granulated sugar alongside eggs & vanilla extract using an electric mixer until pale yellow appears—that lightness signals happiness within those ingredients—as they combine harmoniously creating little pockets of joy awaiting their destiny ahead…
Step 3: Combine Your Dry Ingredients
Now onto incorporating dry elements—they are vital players here too! Add flour along with salt & baking powder gradually mixing until just combined—we want gentle folds here rather than vigorous stirring since overworking could lead us astray toward toughness instead of tenderness desired within brownies… Remember: patience is key when introducing these components together slowly allows gluten development while maintaining chewiness we crave later on…
Step 4: Fold In Chocolate Chunks
Ahh…the final flourish comes next as we gently fold in those glorious chocolate chunks now—you know they’ll melt beautifully during baking forming pockets full o’ gooey goodness within each slice afterward!! Spread this glorious brownie batter evenly across prepared springform pan before sliding into preheated oven—it should bake happily away for approximately twenty-five minutes or until toothpick inserted comes out clean (with perhaps some melted chocolate clinging!). Once done allow cooling completely afterward—all good things require patience after all…
I can’t wait for you to experience how incredible this Thin Mint Cheesecake turns out—it’s bound to become one of those treasured recipes passed along among family & friends because once tasted nobody ever forgets its charm… Stay tuned—we’ve still got plenty more steps leading us toward pure bliss ahead!!
Creating the Perfect Thin Mint Cheesecake Recipe
Step 5: Baking the Brownie Base to Perfection
Now that you’ve stirred your luscious brownie batter together, it’s time to create the foundation for our Thin Mint Cheesecake. Spread that rich, chocolatey mixture evenly into the bottom of your prepared 9-inch springform pan. This is crucial; by ensuring an even layer, you allow the brownies to bake uniformly, giving you a consistent texture throughout. Bake them in your preheated oven at 350°F for about 25 minutes. You’ll know they’re done when the edges are set but the center still has a slight jiggle—trust me on this! The residual heat will continue cooking them as they cool, yielding a wonderfully chewy brownie that perfectly complements the creamy mint cheesecake.
Once those 25 minutes are up, remove your masterpiece from the oven and resist any temptation to dive right in! Instead, let it cool completely in the pan—it’s important because if you rush this step, you might end up with a crumbly mess when trying to transfer it later. Allowing it to cool lets it set and firm up just enough so it holds together beautifully when we get ready for assembly.
Step 6: Releasing Your Brownie Base Like a Pro
After your brownie has cooled down and is looking oh-so-inviting, it’s time to release it from its springform prison. Unlatch the sides of the springform pan gently and run a knife around the edges to loosen any stubborn bits. This little maneuver is key; it keeps your brownie base intact, ensuring that every bite is as satisfying as intended. Flip the brownie over carefully; peeling off the parchment paper should be a breeze since we prepped so well earlier. Once freed, place that gorgeous brownie back in its rightful home—the bottom of the springform pan—before latching the sides back on again.
This technique not only makes sure our crust remains intact but also ensures that we have a sturdy base for our cheesecake layers above. Trust me; this attention to detail means everything in achieving that picture-perfect slice later on!
Step 7: Crafting Your Creamy Mint Layer
Now comes one of my favorite parts—creating that dreamy cheesecake layer! In a large mixing bowl, beat together your softened cream cheese and powdered sugar until smooth and creamy; this usually takes about 2-3 minutes on medium speed. You want to achieve a silky consistency here because this is what will make each bite of cheesecake utterly intoxicating! Next, add in both your mint and vanilla extracts (don’t forget that mint extract is what gives us that classic Thin Mint flavor) and mix until everything is thoroughly combined. This step is non-negotiable; proper mixing ensures all those delightful flavors meld beautifully together.
Now it’s time for some fun—gently fold in about two cups of thawed Cool Whip into this luscious base using a spatula or wooden spoon. Folding is an important technique because you want to maintain that lightness and airiness from the whipped topping while incorporating it into your cheesecake mixture. Watch how everything transforms into a fluffy minty cloud! If you fancy adding color (and who wouldn’t?), now’s your chance—add green gel food coloring until you achieve your desired minty hue. It’s all about visual appeal here; after all, we eat with our eyes first!
Step 8: Bringing It All Together
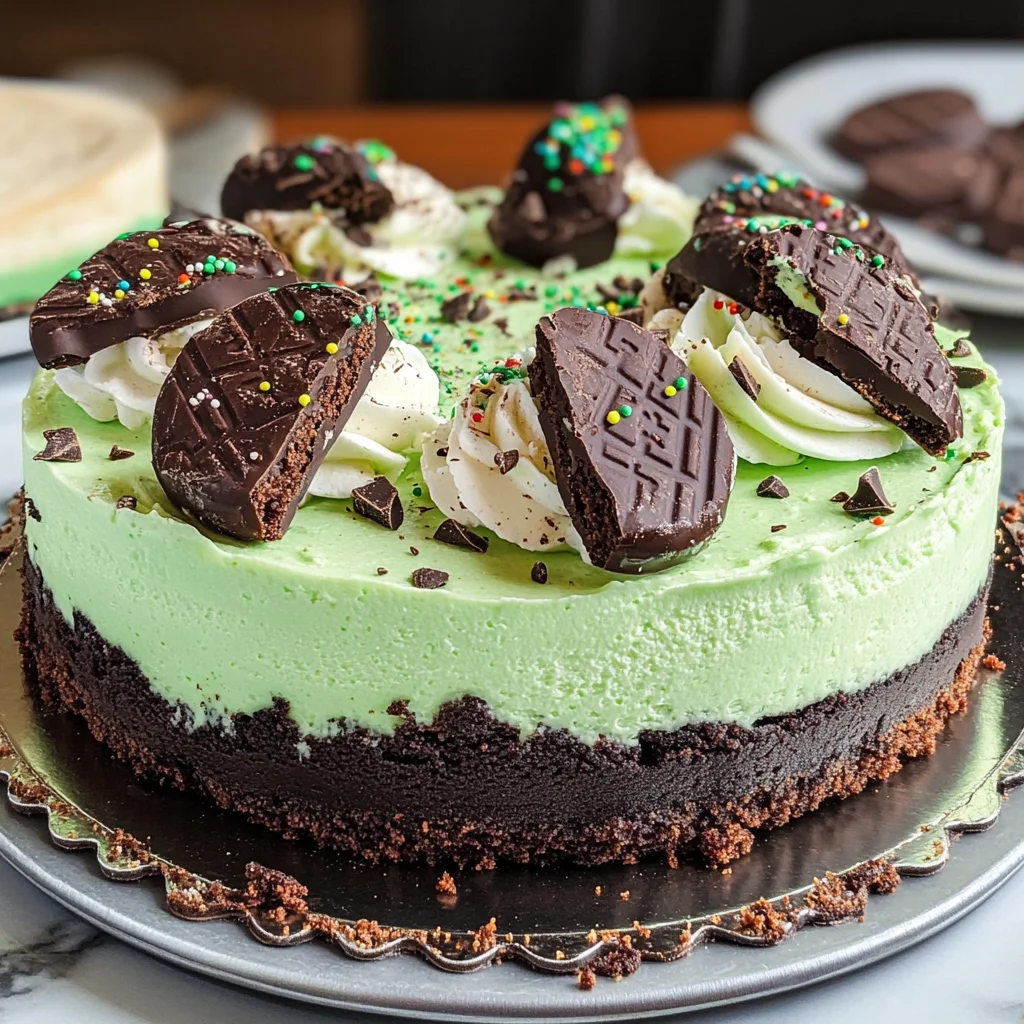
Next up, chop about 15 of those delightful chocolate mint cookies into small pieces and fold them gently into your cheesecake mixture—these little gems add texture and bursts of flavor throughout every slice! Once thoroughly combined, spread this vibrant cheesecake layer evenly over your cooled brownie base using an offset spatula or simply the back of a spoon. Don’t rush this step; taking your time ensures an even layer so each piece looks as enticing as possible.
Now comes one of those magical moments: refrigerate this beauty for at least one hour before removing those springform sides. Why chill? Chilling allows all those flavors to meld beautifully while helping the cheesecake set properly. It’s absolutely paramount for achieving that silky texture we crave in cheesecakes! And trust me—you’ll thank yourself later when every slice holds its shape effortlessly.
Conclusion:
As we wrap up this journey through my beloved Thin Mint Cheesecake Recipe, I can’t help but feel a burst of excitement! Each layer of creamy mint cheesecake atop that chewy brownie crust creates a truly extraordinary dessert experience that dances on your palate. The way the chocolate mingles with refreshing mint is like a warm hug from an old friend—it just feels right. I hope my enthusiasm for this recipe has inspired you; the joy of crafting such a delicious treat is simply contagious!
This recipe is not just about flavor; it encapsulates joy and celebration—think birthday parties, holiday feasts, or casual get-togethers with friends over coffee. Imagine pulling this stunning cheesecake out of the fridge; its inviting green hue adorned with cookie accents beckons everyone closer while releasing an alluring aroma of chocolate and mint that fills the air. It’s an instant crowd-pleaser that’s bound to turn heads and ignite conversations around your table.
When serving this dessert, think outside the box! Imagine savoring one slice alongside a rich cup of coffee or perhaps with a scoop of vanilla ice cream melting gently on top—divine! For an afternoon pick-me-up after work or school, serve it with some fresh strawberries drizzled with chocolate sauce; it’s an experience that goes beyond mere eating; it’s pure bliss on a plate! And for those who dare to indulge further, consider pairing it with whipped coconut cream instead of Cool Whip—it adds an exotic twist that’s simply delightful.
Feeling adventurous? This recipe is wonderfully adaptable! You could swap out the mint extract for orange zest for a citrusy kick or use crushed Oreo cookies instead of mint cookies for something delightfully different yet equally scrumptious! The possibilities are endless, and I encourage you to make this recipe your own—feel free to explore and experiment until you’ve found what makes your heart sing. I can’t wait to hear how yours turns out; please share your experiences and any personal touches you add along the way!
Thin Mint Cheesecake
Indulge in a delightful blend of nostalgia and sophistication with this Thin Mint Cheesecake Recipe. Imagine rich, chewy brownie crust layered with a creamy mint-infused cheesecake that pays homage to your favorite mint cookies. Each forkful offers a perfect balance of chocolate and refreshing mint flavors, making it an unforgettable dessert for any occasion. Whether you’re celebrating with friends or treating yourself after a long week, this cheesecake promises to elevate your dessert experience. With simple ingredients and straightforward steps, you’ll create a stunning centerpiece sure to impress everyone at your table. Get ready to dive into a decadent masterpiece that’s bound to become a cherished favorite!
- Prep Time: 25 minutes
- Cook Time: 25 minutes
- Total Time: 50 minutes
- Yield: Approximately 12 servings 1x
- Category: Dessert
- Method: Baking
- Cuisine: American
Ingredients
- 1/2 cup melted unsalted butter
- 1/4 cup dark cocoa powder
- 2 large eggs
- 1 cup granulated sugar
- 1 teaspoon vanilla extract
- 3/4 cup all-purpose flour
- 3/4 cup chocolate chunks
- 8 oz cream cheese (softened)
- 1/2 cup powdered sugar
- 1/2 teaspoon mint extract
- Cool Whip (thawed, for layering)
- Chocolate mint cookies (for crust and decoration)
- Semi-sweet chocolate chips (for ganache)
Instructions
- Preheat your oven to 350°F (175°C). Line the bottom of a 9-inch springform pan with parchment paper and grease the sides.
- In a bowl, combine melted butter and cocoa powder. Mix well.
- Add eggs, sugar, and vanilla to the cocoa mixture; beat until smooth.
- Gradually mix in flour until just combined, then fold in chocolate chunks.
- Spread the brownie batter evenly in the prepared pan and bake for 25 minutes until set but slightly jiggly in the center. Let cool completely.
- In another bowl, beat cream cheese and powdered sugar until smooth. Add mint and vanilla extracts.
- Gently fold in Cool Whip until fully incorporated.
- Fold chopped chocolate mint cookies into the cheesecake mixture and spread over the cooled brownie base.
- Refrigerate for at least one hour before removing from springform pan.
- For the ganache, melt chocolate chips with heavy cream until smooth; pour over cheesecake once cooled.
- Decorate with remaining cookies and sprinkles before serving.
Nutrition
- Serving Size: 1 slice (100g)
- Calories: 360
- Sugar: 30g
- Sodium: 230mg
- Fat: 22g
- Saturated Fat: 12g
- Unsaturated Fat: 8g
- Trans Fat: 0g
- Carbohydrates: 37g
- Fiber: 2g
- Protein: 5g
- Cholesterol: 60mg