15-Minute Air Fryer Chicken
As I stand in my kitchen, the aromatic scent of seasoned chicken wafts through the air, creating an atmosphere that feels both familiar and comforting. This 15-Minute Air Fryer Chicken is more than just a quick meal; it’s a delightful escape into the world of flavor and warmth. Sometimes, when life gets busy and the clock seems to tick louder, we need a recipe that not only satisfies our hunger but also rekindles our love for cooking. With each tender bite, you’ll find yourself enveloped in the harmony of pantry spices dancing together, creating juicy chicken that boasts an irresistible crispy exterior. Trust me on this one: once you experience this dish, it will undoubtedly become a cherished part of your weeknight repertoire.
What I truly adore about this recipe is its versatility—it’s as if the air fryer has opened up a door to endless possibilities! Whether you’re using succulent chicken thighs or lean breasts, each piece transforms into something extraordinary in just 15 minutes. This 15-Minute Air Fryer Chicken is not merely about speed; it’s about crafting a meal that feels lovingly prepared without the fuss. Imagine serving this at your next family dinner or enjoying it as part of your meal prep for the week—a dish that brings everyone together while being gentle on your schedule. The secret lies not only in the method but also in how these simple ingredients work together to create something truly memorable.
15-Minute Air Fryer Chicken: A Quick Culinary Delight
Let’s embark on this culinary journey together! The beauty of this recipe lies in its simplicity combined with incredible flavor. You’ll see just how easy it is to whip up a delicious chicken dish that won’t keep you tethered to the stove for hours. So, gather your ingredients and get ready to enjoy not only a meal but also the process of creating something magical.
Ingredients:
As we dive into the world of flavors and aromas, each ingredient plays its own vital role in transforming humble chicken into something so much more. Let’s explore what we’ll need for our 15-Minute Air Fryer Chicken!
- 2 boneless, skinless chicken thighs or breasts (about 1 pound). Choosing between thighs and breasts can be an adventure! Chicken thighs are known for their rich flavor and juiciness due to their higher fat content, making them incredibly forgiving during cooking. On the other hand, chicken breasts offer a leaner option with a subtle taste that easily absorbs seasonings. Whichever cut you choose, ensure they’re fresh—look for meat that’s pinkish and firm without any unpleasant odors. If you have leftovers or want to mix things up another day, shredded cooked chicken can also be used in salads or wraps!
- 1 tablespoon olive oil. Often hailed as liquid gold in kitchens around the world, olive oil serves multiple purposes here—it helps our spices adhere beautifully to the chicken while providing moisture during cooking. It’s essential for achieving that gorgeous golden-brown crust we all crave! When purchasing olive oil, opt for extra virgin for its superior flavor profile and health benefits. Remember, quality matters here; authentic olive oil will enhance every bite.
- 1 teaspoon garlic powder. Garlic powder is one of those pantry staples that packs an enormous punch! It adds depth and warmth without overwhelming the dish with raw garlic’s sharpness—perfect for busy nights when you want convenience without sacrificing taste. If you happen to have fresh garlic on hand instead, feel free to use about half a clove minced; just remember that fresh garlic can burn if overcooked.
- 1 teaspoon smoked paprika. Ahh, smoked paprika—the spice that whispers secrets of sun-drenched peppers and adds an enchanting smokiness to our chicken! Not only does it provide color and aroma but it also elevates our dish by creating layers of flavor that evoke memories of summer barbecues. If you can’t find smoked paprika at your local market, regular paprika will work too; just expect a different flavor profile.
- 1 teaspoon onion powder. This essential ingredient rounds out our spice blend by offering sweetness and richness reminiscent of slowly caramelized onions—without any actual chopping involved! Onion powder ensures even distribution throughout the chicken while amplifying its savory notes without overpowering other flavors.
- 1 teaspoon salt. Salt is often referred to as nature’s flavor enhancer—and rightly so! It draws out moisture while accentuating all other ingredients’ natural tastes. In this recipe, salt acts as an essential building block for flavor development—don’t skip it! Just be mindful not to overdo it; balance is key!
- 1/2 teaspoon black pepper. Ahh yes—the finishing touch! Black pepper adds warmth and complexity that’ll make your taste buds sing with joy! Freshly cracked black pepper is ideal here because it unleashes oils and aroma that pre-ground versions simply can’t match.
Equipment You’ll Need:
Before jumping into action, let’s gather our trusted tools—the unsung heroes behind every successful kitchen endeavor! Having the right equipment makes cooking not only easier but also much more enjoyable.
- Air fryer – This marvelous gadget transforms how we approach crispy foods by using hot air circulation instead of copious amounts of oil—resulting in wonderfully crunchy textures without guilt! It cooks evenly while keeping everything juicy inside—a true game changer in modern cooking!
- Mixing bowl – A simple yet crucial tool where magic begins! You’ll use this bowl for combining your spices with olive oil before coating your chicken evenly—ensuring every bite bursts with flavor!
- Meat thermometer – Although optional, I highly recommend investing in one if you’re serious about perfectly cooked proteins every time! This handy tool takes away any guesswork by allowing you to check internal temperatures accurately; poultry should reach at least 165°F for safety.
- Tongs – Your best friends during flipping time! Tongs give you control over handling hot items like chicken without fear of burns while allowing you to turn them gracefully mid-cook—trust me; they’re worth having around!
Preparing the 15-Minute Air Fryer Chicken
Step 1: Preparing Your Chicken
Before diving into seasoning bliss, it’s essential first to prepare your chicken properly—this step sets the stage for success! Start by trimming excess fat from the thighs or breasts; this keeps our dish light while still ensuring juicy results later on. Once you’ve done that, pat each piece dry using paper towels—it may seem trivial but trust me when I say moisture management is crucial here! When moisture clings to meat surfaces during cooking, it can lead to steaming rather than caramelization which ultimately affects texture negatively—a non-negotiable step if we want crispy perfection!
Step 2: Creating Your Flavorful Coating
Now that your chicken has been prepped beautifully let’s move onto mixing those fabulous spices together! In a medium-sized mixing bowl (the same one we’ll use later), combine olive oil along with garlic powder, smoked paprika, onion powder, salt & black pepper—you’re crafting an aromatic marinade that’s going to coat every inch of our protein goodness! Gently whisk everything together until well-blended; imagine how those flavors marry beautifully as they mingle—that’s magic right there waiting to happen! Take each piece of chicken and toss them into this glorious mixture ensuring every nook & cranny gets coated evenly—don’t rush this step; allow time for those flavors infuse deeply into each morsel!
Step 3: Preheating Your Air Fryer
Next up: preheating your air fryer—an often overlooked yet absolutely paramount step toward achieving perfectly cooked results across all types of foods including our beloved chicken! Set your air fryer temperature at precisely 380°F (equivalent to approximately 193°C) allowing it ample time (around 2–3 minutes) before introducing any food inside—that short wait ensures consistent heat throughout which leads directly towards achieving golden-brown crispiness later on—it’s totally worth it!
Step 4: Air Frying Your Chicken
Now comes one of my favorite parts—the actual cooking process where all those carefully prepared components come together beautifully within mere minutes! Once preheated adequately (always double-check!), take each seasoned piece of chicken placing them gently into their designated space within your air fryer basket ensuring they lay flat without overcrowding (allowing proper airflow)—this encourages even browning across surfaces giving us beautiful coloration later down line too don’t forget about turning halfway through after roughly seven minutes has passed either so everything cooks evenly front-to-back side-to-side—the goal here? Achieving tenderness alongside crispiness simultaneously which means patience pays off handsomely here folks!
I can already feel excitement building as we move closer towards enjoying our scrumptious creation together—stay tuned because more delightful steps await soon enough as we finish off preparing these tender little wonders straight from heaven onto plates ready awaiting eager mouths hungry craving deep satisfaction delivered through home-cooked goodness like never before…
Step 5: Air Frying to Golden Perfection
Now comes the moment that transforms your chicken from marinated goodness into a beautiful, crispy masterpiece! Preheat your air fryer to 380°F for about 2-3 minutes before you place the chicken in. This step is absolutely paramount because it ensures that your chicken will start cooking immediately once it hits the basket, promoting that golden-brown exterior we all crave. Think of this as giving your chicken a warm welcome; they’ll be enveloped in a cozy, hot environment that allows them to cook evenly and retain their juices. As you wait, take a moment to relish the delightful aroma wafting from the spices—it’s like a sneak peek into the symphony of flavors that awaits.
Once your air fryer is preheated, gently place the seasoned chicken in a single layer within the basket. It’s crucial not to overcrowd; this allows hot air to circulate around each piece, creating that irresistible crispness we adore. Trust me on this one—if you pile them up or stack them, you might just end up with unevenly cooked chicken that can be rubbery rather than juicy. As you close that air fryer, let the magic begin! Set your timer for 7-8 minutes and pause to appreciate how easy this is—it’s almost too good to be true!
Step 6: Flipping for Even Crispiness
After those initial 7-8 minutes pass, it’s time to flip your chicken so both sides can bask in that heat and develop an even crust. Carefully open the air fryer—watch out for any steam escaping like a little surprise—but don’t rush this step! Letting that steam escape is essential; otherwise, you risk losing moisture and crispness. Using tongs or a spatula, gently turn over each piece of chicken with love and care. You should see a lovely golden-brown crust forming on one side already—this crust is where flavor lives!
Set your timer again for another 7-8 minutes. During this time, I encourage you to take a moment and visualize how you’ll serve this dish—will it be nestled atop a vibrant salad, alongside fluffy rice, or perhaps tucked into warm tortillas? It’s moments like these when you realize how versatile this recipe truly is. As those last few minutes tick away, keep an eye on the internal temperature using a meat thermometer if you have one handy; you’re aiming for 165°F at its thickest part. This isn’t just about safety; hitting this temperature guarantees that every bite will be tender and succulent.
Step 7: The Resting Phase – A Crucial Step
Ahh, the resting phase! Once you’ve reached that magical internal temperature of 165°F and flipped open the basket to unveil your golden beauties, resist the urge to dive right in—this part is non-negotiable! Transfer your perfectly cooked chicken thighs or breasts onto a cutting board and let them rest for at least 5 minutes before slicing into them. Why is resting so important? Well, during cooking, muscle fibers tighten up as they heat, pushing juices toward the center of the meat. If you cut into it immediately after cooking, all those delicious juices will spill out onto your plate instead of being absorbed back into the meat.
By allowing it to rest undisturbed—a practice I consider nothing short of culinary magic—you’re granting those juices time to redistribute throughout each piece of chicken. When you finally slice into it after these few moments of patience (and yes, I know it may feel like forever), you’ll be rewarded with juicy morsels bursting with flavor instead of dry bites that leave you longing for more. This step takes only a few extra moments but can make all the difference between meh and wow!
Step 8: Serving Up Your Masterpiece
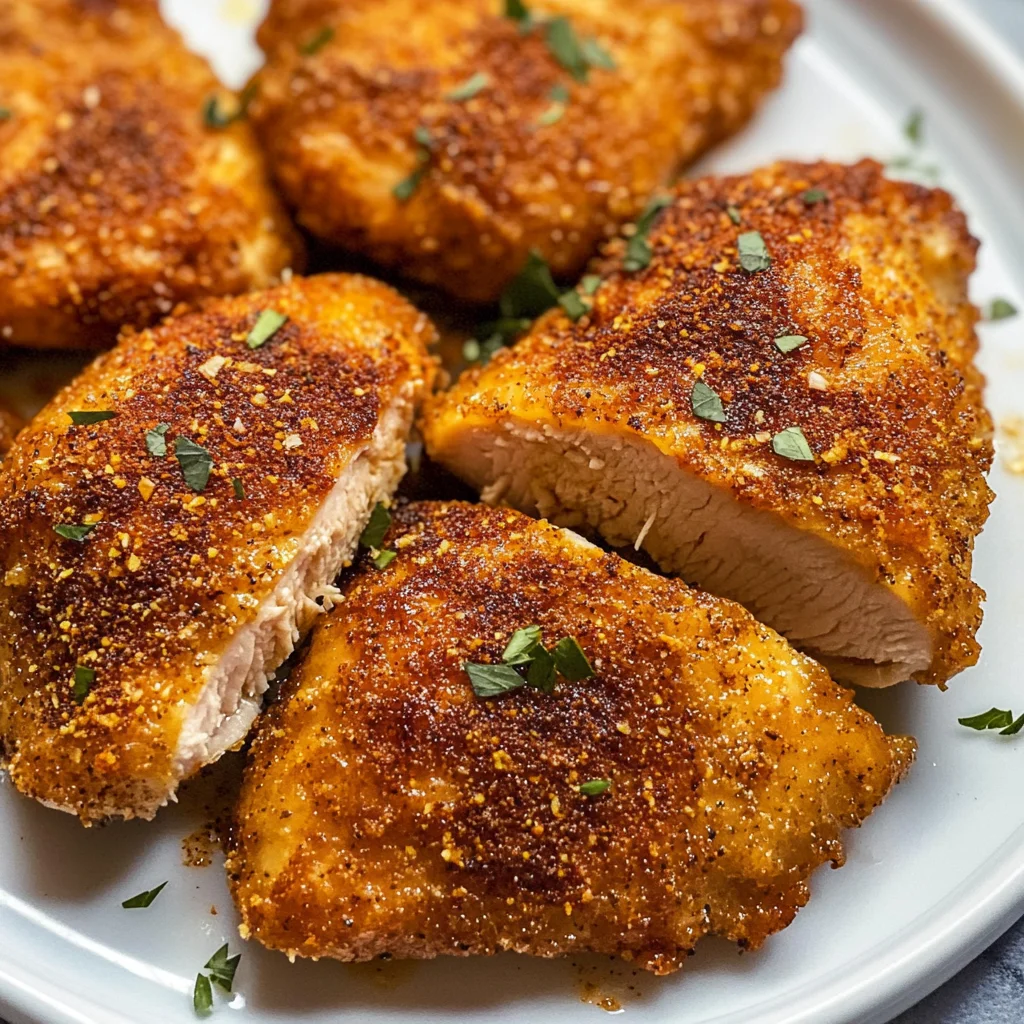
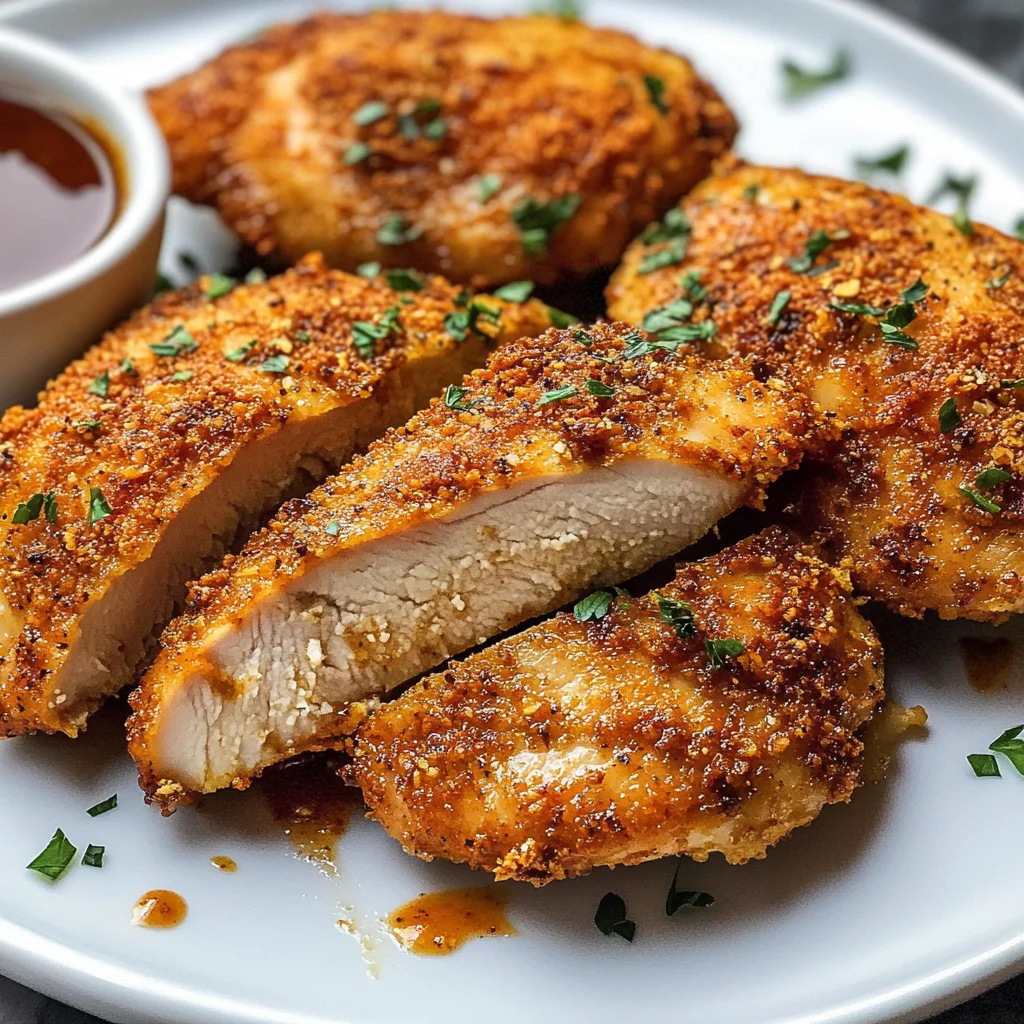
Now comes perhaps my favorite part—the serving! Because trust me when I say these pieces are not just food; they are an experience waiting to unfold on your dinner table. Slice up your rested chicken into perfect strips or chunks and get ready to enjoy an explosion of flavors in every bite! The outside has taken on that glorious crispiness while sealing in all those savory spices—the garlic powder’s warmth mingled perfectly with smoky paprika creates something fundamentally extraordinary.
You can enjoy this delightful creation in countless ways: toss it onto fresh greens for an invigorating salad drizzled with zesty vinaigrette or pair it with roasted vegetables for a colorful dinner plate bursting with nutrients. Don’t forget about leftovers—they are fantastic for meal prep! Just store any remaining pieces in an airtight container in the fridge. They’ll stay wonderfully moist and ready for quick lunches throughout the week—perfectly versatile for wraps or grain bowls!
Experience Your Culinary Triumph
As you dig into your delightful creation tonight or savor those leftovers tomorrow afternoon, take pride in knowing you’ve crafted something not only delicious but also incredibly quick and straightforward. This 15-Minute Air Fryer Chicken is not just another recipe but rather an invitation into flavorful possibilities! Each bite brings comfort and satisfaction—a reminder of how simple ingredients can come together to create something truly special at home without breaking a sweat in the kitchen. Enjoy every mouthful!
Storage and Enjoyment Tips for Your 15-Minute Air Fryer Chicken
Now that your delightful 15-Minute Air Fryer Chicken is ready to enjoy, I can hardly contain my excitement for you! This dish is not only a quick fix but also a flavorful adventure that you’ll want to revisit time and again. But what happens if you have some leftovers? Don’t worry; this chicken holds up wonderfully, allowing you to savor those flavors even after the first meal.
Storing Leftover 15-Minute Air Fryer Chicken
To keep your leftover chicken as juicy and flavorful as when it first came out of the air fryer, I recommend storing it in an airtight container. Glass or BPA-free plastic containers work wonders, ensuring that moisture doesn’t escape while also keeping those delicious aromas intact. You can pop your cherished leftovers in the fridge where they’ll stay fresh for about three to four days. Now, here’s a little pro tip: placing a slice of bread in the container can help absorb excess moisture, preventing that dreaded sogginess that sometimes creeps in after a day or two. When it comes to reheating, simply pop them back into your air fryer at 350°F for about five minutes, which will restore that crispy exterior and juicy interior – trust me, it’s like magic! The flavor remains vibrant even after storage, making it perfect for quick lunches or easy dinners throughout the week.
Freezing Chicken for Later
If you want to take your meal prep game to the next level, freezing your 15-Minute Air Fryer Chicken is an excellent option! To do this effectively, allow the chicken to cool completely before wrapping each piece tightly in plastic wrap or aluminum foil. Then place them in a freezer-safe bag or container; just make sure to squeeze out any excess air to prevent freezer burn. Properly stored this way, your chicken can last up to three months in the freezer without losing its delightful flavor or texture. When you’re ready to use it, simply transfer it from the freezer to the refrigerator a day before you plan on enjoying it or reheat straight from frozen in your air fryer at 380°F until heated through. This convenience lets you whip up a healthy meal with minimal effort on busy days – how fantastic is that?
15-Minute Air Fryer Chicken

Experience the joy of home cooking with this 15-Minute Air Fryer Chicken recipe, where speed meets flavor! This dish transforms simple chicken thighs or breasts into a crispy, juicy delight that’s perfect for busy weeknights. With just a handful of pantry spices and the magic of an air fryer, you can create a meal that feels lovingly crafted without the long cooking times. The rich flavors of garlic powder, smoked paprika, and onion powder blend harmoniously to elevate your chicken to new heights. Whether served over a fresh salad, alongside roasted veggies, or tucked into wraps for lunches, this versatile recipe will quickly become a staple in your kitchen.
- Prep Time: 5 minutes
- Cook Time: 10–16 minutes
- Total Time: 0 hours
- Yield: Serves approximately two people 1x
- Category: Main
- Method: Frying
- Cuisine: American
Ingredients
- 2 boneless, skinless chicken thighs or breasts (about 1 pound)
- 1 tablespoon olive oil
- 1 teaspoon garlic powder
- 1 teaspoon smoked paprika
- 1 teaspoon onion powder
- 1 teaspoon salt
- 1/2 teaspoon black pepper
Instructions
- Prepare the chicken by trimming excess fat and patting dry with paper towels.
- In a mixing bowl, combine olive oil, garlic powder, smoked paprika, onion powder, salt, and black pepper to create a marinade.
- Coat each piece of chicken evenly in the marinade.
- Preheat your air fryer to 380°F for about 2–3 minutes.
- Place seasoned chicken in the air fryer basket in a single layer and cook for 7–8 minutes.
- Flip the chicken and cook for another 7–8 minutes until it reaches an internal temperature of 165°F.
- Allow to rest for at least 5 minutes before slicing.
Nutrition
- Serving Size: 1 serving
- Calories: 320
- Sugar: 0g
- Sodium: 780mg
- Fat: 20g
- Saturated Fat: 3g
- Unsaturated Fat: 17g
- Trans Fat: 0g
- Carbohydrates: 2g
- Fiber: 0g
- Protein: 32g
- Cholesterol: 110mg