Zucchini Bread
There’s something profoundly comforting about the aroma of freshly baked Zucchini Bread wafting through the kitchen. You know that feeling when you come home after a long day and the smell of something warm and sweet just wraps around you like a cozy blanket? That’s exactly what this Zucchini Bread does. It’s not merely a recipe; it’s a heartfelt embrace from your past, a delicious reminder of summer bounties, and an invitation to share joy with family and friends. The lush, green zucchini blends beautifully into a batter kissed with cinnamon—a spice that dances on the palate—and together they create a moist, fluffy bread that is utterly intoxicating. Trust me, once you whip up a batch, it will become a staple in your home, filling your days with a profound satisfaction.
This Zucchini Bread has roots deeply embedded in home kitchens across America, where gardeners often find themselves with an abundance of zucchini during the summer months. What better way to celebrate this versatile vegetable than by transforming it into something warm and delightful? Each bite of this bread is like a tiny celebration of those lazy summer afternoons spent in the garden or at grandma’s house, where every slice serves as a reminder of love and tradition. Whether you choose to enjoy it for breakfast alongside your morning coffee or as an indulgent snack throughout the day, this recipe is perfect for any occasion—be it an afternoon tea party or just because you need something sweet to brighten up your day!
Zucchini Bread: A Sweet Slice of Summer
Let’s embark on this culinary journey together! Making Zucchini Bread is not just about following steps; it’s about embracing the process, enjoying the sensory experience, and savoring the flavors that unfold in your kitchen. As we gather our ingredients and tools, remember that each element plays a crucial role in creating that perfect loaf. So let’s dive right into what makes this Zucchini Bread so special!
Ingredients:
To start off on the right foot, let’s gather our ingredients. Each component here isn’t just filling; they all work harmoniously together to create that beautiful loaf we’re aiming for.
- 2 cups all-purpose flour: This ingredient is your foundation—the building block of your Zucchini Bread. All-purpose flour provides structure without being too heavy, allowing our bread to rise beautifully while still maintaining that lovely moistness we crave. When measuring flour, it’s important not to pack it too tightly in your cup; instead, use a spoon to fluff it up before scooping it into your measuring cup for accuracy.
- 1 ½ cups granulated sugar: Ah, sugar—the magical crystal that transforms our batter into something wonderfully sweet! Not only does sugar add sweetness but it also contributes to browning and moisture retention during baking. If you’re looking for added depth of flavor without sacrificing sweetness, consider using brown sugar instead; it brings along caramel notes that elevate this bread even further.
- 1 ½ teaspoons baking powder: This leavening agent is essential for giving our Zucchini Bread its lightness. It works by producing carbon dioxide bubbles when mixed with moisture and heat, which helps our batter rise as it bakes. Make sure to check the expiration date on your baking powder; if it’s old, you might end up with a dense loaf instead of one that’s airy and fluffy.
- ½ teaspoon baking soda: Another leavening agent but different from baking powder—baking soda needs an acid (like the moisture from our grated zucchini) to activate its rising power. This ingredient ensures that our bread puffs up perfectly while also balancing out acidity from other components.
- 1 tablespoon cinnamon: Cinnamon adds warmth and depth to our Zucchini Bread—it awakens all the senses! Its aromatic qualities are deeply comforting and remind us of cozy times spent in the kitchen. Feel free to experiment with other spices like nutmeg or ginger if you’re feeling adventurous; they bring unique flavors that can make this recipe truly yours.
- 1 teaspoon salt: Don’t shy away from salt! It enhances sweetness and balances flavors beautifully in baking. Without salt, our bread would taste flat—trust me when I say it’s absolutely paramount for bringing out all those vibrant tastes we’re aiming for.
- 2 cups grated zucchini (approximately 2 small): Here’s where we get to incorporate those garden-fresh zucchinis! They add moisture and nutrition while blending seamlessly into the bread so that even picky eaters won’t suspect they’re there. When grating zucchini, try using the larger holes on your box grater; you want shreds rather than mushy bits so they distribute well throughout the batter.
- ¾ cup vegetable oil: This liquid gold is responsible for keeping our Zucchini Bread incredibly moist and tender while contributing richness without overwhelming flavors. You could substitute with melted coconut oil or applesauce if you’d like—a great way to reduce fat while adding some natural sweetness!
- 3 large eggs: Eggs provide structure as well as moisture—it’s their job to bind everything together! Make sure they’re at room temperature before mixing them in; this ensures they blend smoothly into your batter rather than creating lumps.
- 2 teaspoons vanilla extract: A splash of vanilla enhances overall flavor; think of it as adding that final touch—a secret ingredient if you will! Always choose pure vanilla extract over imitation for better quality flavor—it truly makes all the difference.
- 1 ½ cups chopped walnuts (or pecans): Nuts are optional but highly encouraged for added crunch and richness! They contribute healthy fats while adding texture contrast against soft bread slices. If you’re not fond of nuts or have allergies to consider, feel free to skip them entirely or try tossing in some chocolate chips instead for a delightful twist!
Equipment You’ll Need:
Having the right tools at hand can make all the difference when whipping up this delicious treat! The joy of cooking comes not only from mixing ingredients but also from using equipment designed to enhance each step along the way.
- Two 8×4-inch loaf pans: These pans are essential for shaping your loaves perfectly! Their size ensures even baking while providing enough volume for lovely tall loaves filled with flavor. If you don’t have these exact dimensions on hand, don’t worry—just keep an eye on bake time since different sizes may require adjustments.
- Mixing bowls (medium & large): A good set of mixing bowls allows you plenty of room to whisk ingredients together without worrying about spills or splatters! I recommend having at least one medium bowl for dry ingredients and one large bowl for combining everything else—that way you’ll keep things organized throughout each step.
- Whisk: A sturdy whisk will help blend dry ingredients smoothly before incorporating them into wet mixtures—this simple tool makes sure everything melds together beautifully without clumps forming!
- Spatula: A spatula is non-negotiable when folding gently through batters! This tool helps ensure everything combines well without overmixing—trust me when I say that’s key for achieving fluffy results!
Step 1: Prepping Your Oven & Pans
To kick things off right, preheat your oven to 350˚F (175˚C). This step is crucial because starting with a hot oven creates an environment where baked goods can rise properly right from the beginning—a fundamental aspect known as “oven spring.” While waiting for your oven’s warmth to envelop your kitchen like an affectionate hug, take those two 8×4-inch loaf pans and grease them generously using either cooking spray or butter; this prevents sticking later on when we want those beautiful loaves sliding out effortlessly!
Step 2: Mixing Dry Ingredients
In one medium mixing bowl (preferably glass or metal), whisk together 2 cups all-purpose flour, 1 ½ cups granulated sugar, 1 ½ teaspoons baking powder, ½ teaspoon baking soda, tablespoon cinnamon**, and 1 teaspoon salt until evenly combined—this step helps distribute leaveners throughout so every bite rises uniformly! Don’t rush through this process; take time here because ensuring everything blends well now will lead us toward success later down the line.
Step 3: Combining Wet Ingredients
Now let’s move onto creating our wet mixture! In another large bowl (the biggest one you’ve got!), combine those luscious grated zucchinis with ¾ cup vegetable oil, three large eggs, and two teaspoons vanilla extract**—a fragrant addition that’ll make your heart sing every time you catch whiffs during baking! Use a sturdy spoon or spatula here—mix until everything looks well incorporated but still remains slightly chunky from zucchini shreds—that texture adds character!
Step 4: Bringing It All Together
Here comes an exciting moment—we’re merging dry AND wet mixtures together! Gently fold half of those prepped dry ingredients into wet ones until JUST combined—you should see streaks remaining visible rather than fully blended—that’s absolutely okay because overmixing leads us straight towards dense loaves instead of light airy delights! Repeat by adding remaining dry mix alongside those chopped walnuts (or pecans)—take care NOT TO OVERMIX; trust me when I say patience pays off greatly here!
With these initial steps laid out before us clearly now let’s continue crafting this heavenly Zucchini Bread masterpiece…
The Heart and Soul of Zucchini Bread
Step 5: Folding in Flavor – The Art of Combining
Now that we have our wet ingredients mixed to perfection, it’s time to introduce the dry ingredients into the mix. This is where the magic happens! Gently add your dry mixture—comprising all-purpose flour, granulated sugar, baking powder, baking soda, cinnamon, and salt—into the bowl with the grated zucchini and the other wet components. Using a rubber spatula or wooden spoon, fold everything together until just combined. It’s absolutely crucial here not to overmix; think of this step as an intimate gathering of flavors rather than a vigorous workout. Overmixing can lead to a dense loaf because it develops gluten in the flour, which can make your Zucchini Bread tough instead of soft and fluffy.
As you fold, watch for those beautiful streaks of flour disappearing into the batter; you want to see a few lumps remain—this is okay! Trust me on this: those little pockets of flour will disappear during baking, allowing your bread to rise beautifully. You’ll find that your batter begins to thicken slightly as it comes together, and its color deepens thanks to the vibrant green of the zucchini. And speaking of zucchini, aren’t you just amazed at how moisture-rich it is? This humble vegetable adds not only moisture but also an incredible tenderness that makes each slice feel like a warm hug. If you’re adding walnuts or pecans (which I highly recommend for that lovely crunch), sprinkle them in now and give them a gentle fold into the batter so they’re evenly distributed.
Step 6: Dividing and Conquering
Next up, let’s talk about portioning this delightful batter into two loaf pans. Before diving in, make sure your oven is already preheating at 350°F—it’s vital for achieving that perfect rise and crust! Take out those greased 8×4-inch loaf pans we prepared earlier; they should be ready to go. Now, divide your luscious batter equally between the two pans. Pour it in gently, letting it fall naturally without force; this will help minimize air bubbles which can create uneven textures once baked.
As you pour, take a moment to appreciate how thick and rich the batter looks—it’s like pouring liquid gold into those pans! Once filled, give each pan a gentle shake from side to side; this helps settle the batter evenly within the pans and reduces any unsightly air pockets lurking beneath. A quick tip here: if you notice that one loaf pan seems fuller than another after pouring (which can happen), simply scoop some batter from the fuller one and adjust accordingly until both are even. This attention to detail ensures uniform baking so that both loaves emerge from the oven perfectly golden brown.
Step 7: Baking Bliss – The Transformation Begins
Now comes one of my favorite parts—the baking! Slide those filled pans into your preheated oven and let them work their magic for about 50-60 minutes. While they bake, an utterly intoxicating aroma will start wafting through your kitchen—trust me when I say this is one time where you won’t mind waiting! Every minute spent in that warm embrace of heat transforms our simple ingredients into something profoundly satisfying.
But here’s where patience plays a key role: keep an eye on them toward the end of baking time. You’ll know they’re ready when their tops are beautifully golden brown and spring back lightly when touched—a gentle poke should leave no indentation behind. Another great test for doneness is inserting a toothpick into the center; if it comes out clean or with just a few moist crumbs attached (not wet batter!), then congratulations—you’ve nailed it! Just remember not to open that oven door too soon; doing so can cause sudden temperature changes leading to sunken loaves!
Step 8: The Cooling Down Ritual
Once your Zucchini Bread has baked to perfection (and oh boy, does it smell divine!), it’s essential to allow them some time to cool down before we dig in—believe me when I say this step matters more than you might think! Carefully remove those loaves from the oven using oven mitts (they’ll be hot!) and let them cool in their pans for about 15 minutes on a wire rack or cooling surface. Why do we cool? Allowing them cools slightly helps set the crumb structure without making them gummy or overly moist in texture.
After those 15 minutes have passed—and yes, I promise it will feel longer than it actually is—gently run a butter knife along the edges of each loaf pan to loosen any stubborn bits clinging on for dear life. Then flip each pan upside down onto your wire rack; give it a little tap on top if they need encouragement—a soft thud means they’re ready! Letting them cool completely will enhance their flavors beautifully as well as ensure they’re easier to slice later on without crumbling apart.
The Grand Finale – Slicing into Sweetness
Step 9: Slicing & Serving – Your Moment of Triumph
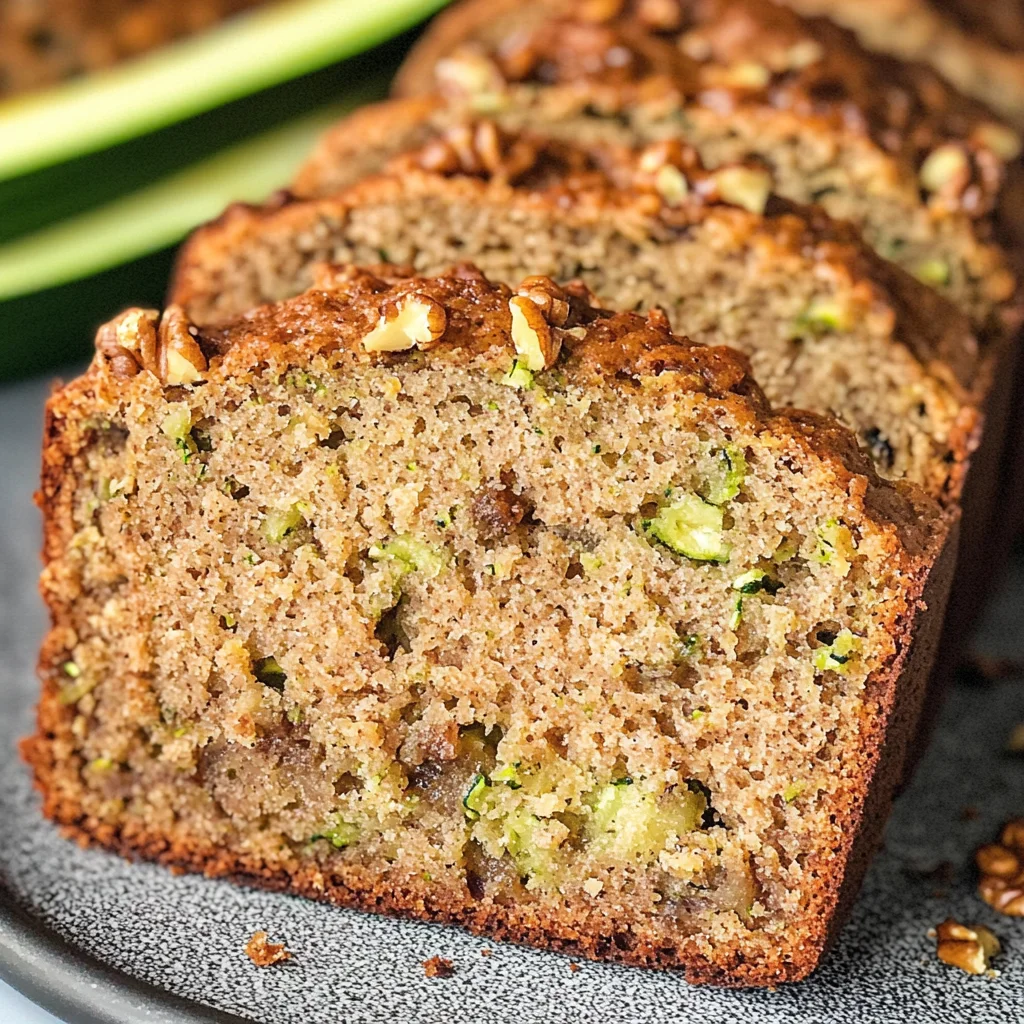
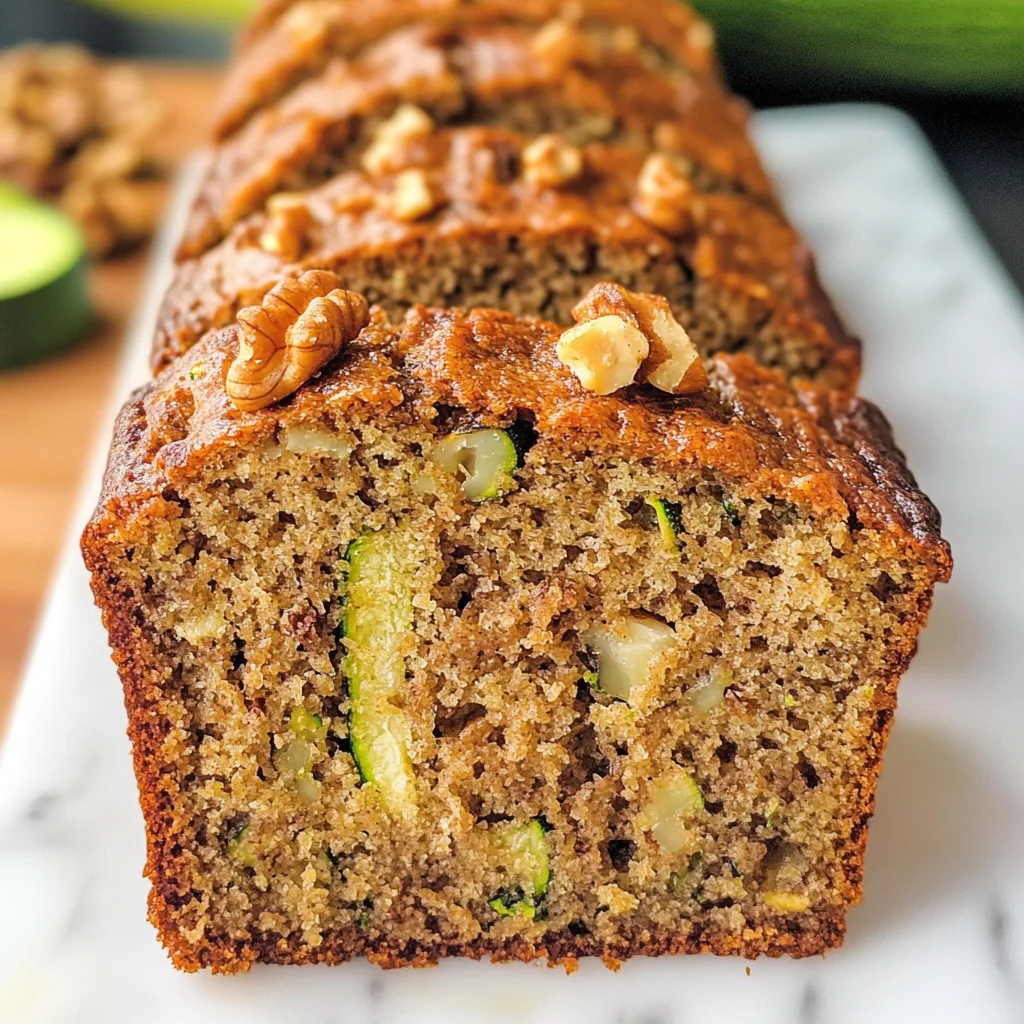
Finally! We’ve reached that magical moment where all your hard work pays off—you’re now ready to slice into your heavenly Zucchini Bread! As you pick up your sharp knife and make that first cut through its tender crust, listen closely; you’ll hear an enticing sound as the blade glides through moist bread revealing an inviting swirl packed with flavor throughout each slice.
Take a moment here—appreciate how beautiful these loaves look! Those flecks of green zucchini alongside crunchy walnut pieces create such an appealing visual contrast against the warm golden-brown crust. Serve warm or at room temperature with a pat of vegan butter or perhaps even cream cheese spread if you’re feeling indulgent (don’t worry—I won’t tell!). Each bite promises an explosion of cinnamon-spiced sweetness balanced by nutty crunches—a truly extraordinary experience!
And remember: Zucchini Bread isn’t just for breakfast; it makes for delightful afternoon snacks or even dessert after dinner! With every slice shared among family or friends (or enjoyed solo while curled up with a good book), you’ll find joy in knowing you’ve baked something special from scratch with love—and that’s what cooking is all about! So go ahead—slice away and let everyone savor what you’ve created together today!
Storage and Enjoyment Tips for Your Zucchini Bread
Now that you’ve baked this utterly intoxicating Zucchini Bread, it’s time to savor every slice of this moist, fluffy delight! But wait—what if you can’t finish it all in one sitting? Fear not, my friend! I’m here to share some wonderful storage tips that will keep your bread fresh and delicious for days to come. Whether you want to enjoy a slice for breakfast or as an afternoon snack, I promise you’ll want to store your leftovers properly so that every bite remains just as scrumptious as when it first came out of the oven.
Storing Leftover Zucchini Bread
To ensure your Zucchini Bread stays moist and fluffy, wrap it tightly in plastic wrap or place it in an airtight container. This is crucial because exposure to air can quickly dry out this delightful treat. If stored correctly at room temperature, your bread will stay fresh for about 3-4 days. For those who might be wondering about long-term storage, I recommend slicing the bread before wrapping; this way, you can easily grab a piece whenever the craving hits! When you take a bite after a day or two, you’ll find the flavors have melded beautifully—the spices deepen while the zucchini adds an ever-so-slight sweetness. If you fancy a warm slice, simply pop it in the microwave for about 10 seconds or toast it lightly on a skillet. Trust me on this; there’s something so satisfying about that warm aroma wafting through your kitchen again!
Freezing Zucchini Bread for Later
If you’re looking to take preservation a step further, freezing your Zucchini Bread is an absolute game-changer. To freeze it properly, let the loaves cool completely before wrapping them tightly in plastic wrap and then placing them in a freezer-safe bag or container. This method prevents freezer burn and keeps that delicious moisture locked inside. You can store it frozen for up to three months—yes, three whole months of bliss waiting patiently in your freezer! When you’re ready to indulge again, simply remove a loaf from the freezer and let it thaw overnight in the refrigerator or for a couple of hours at room temperature. The convenience factor is absolutely paramount here; imagine being able to pull out homemade comfort food any time you wish! It’s like having a little piece of love ready to go whenever you need it.
Zucchini Bread
Indulge in a slice of comfort with our delightful Zucchini Bread, where the warm aroma of freshly baked goodness fills your kitchen. This easy-to-make recipe combines shredded zucchini with cinnamon-spiced batter, resulting in a moist, fluffy loaf that’s perfect for breakfast or as a sweet snack throughout the day. Each bite evokes memories of sun-soaked summer gardens and friendly gatherings, making it a timeless favorite. With the added crunch of walnuts and the option to experiment with spices, this versatile treat will quickly become a staple in your home. Whether enjoyed plain or dressed up with spreads, this Zucchini Bread is sure to bring smiles to every occasion.
- Prep Time: 15 minutes
- Cook Time: 60 minutes
- Total Time: 1 hour 15 minutes
- Yield: About 12 servings 1x
- Category: Dessert
- Method: Baking
- Cuisine: American
Ingredients
- 2 cups all-purpose flour
- 1 ½ cups granulated sugar
- 1 ½ teaspoons baking powder
- ½ teaspoon baking soda
- 1 tablespoon cinnamon
- 1 teaspoon salt
- 2 cups grated zucchini
- ¾ cup vegetable oil
- 3 large eggs
- 2 teaspoons vanilla extract
- 1 ½ cups chopped walnuts (optional)
Instructions
- Preheat your oven to 350°F (175°C) and grease two 8×4-inch loaf pans.
- In a medium bowl, whisk together flour, sugar, baking powder, baking soda, cinnamon, and salt.
- In a larger bowl, combine grated zucchini, vegetable oil, eggs, and vanilla extract until well mixed.
- Gradually add the dry ingredients to the wet mixture, folding gently until just combined.
- If using walnuts, fold them into the batter at this stage.
- Divide the batter evenly between the prepared pans and smooth the tops.
- Bake for 50-60 minutes or until golden brown and a toothpick inserted into the center comes out clean.
- Allow to cool in pans for 15 minutes before transferring to wire racks to cool completely.
Nutrition
- Serving Size: 1 slice (65g)
- Calories: 210
- Sugar: 10g
- Sodium: 150mg
- Fat: 9g
- Saturated Fat: 1g
- Unsaturated Fat: 8g
- Trans Fat: 0g
- Carbohydrates: 33g
- Fiber: 1g
- Protein: 3g
- Cholesterol: 30mg