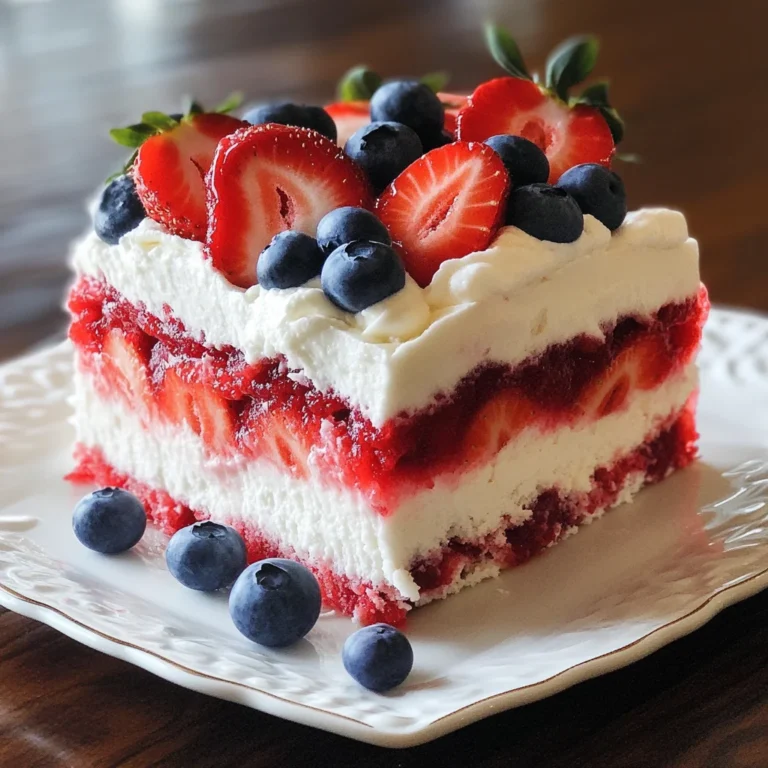
No Bake Summer Berry Lasagna
There’s something profoundly magical about summer desserts, isn’t there? As the days grow longer and the sun shines brighter, we find ourselves craving light, refreshing treats that carry the essence of sunshine within them. This No Bake Summer Berry Lasagna is more than just a dessert; it’s a sweet celebration of the season that brings together vibrant flavors and textures in a delightful way. Imagine layers of luscious cream cheese, fluffy whipped cream, and a chorus of fresh berries—all nestled between buttery graham cracker crumbs. Each bite is like a mini-vacation on your taste buds, a decadent reminder that life is meant to be savored.
This recipe has always been a staple in my home during summer gatherings—perfect for Memorial Day barbecues or a festive 4th of July picnic. It’s incredibly easy to whip up, which means you can spend less time in the kitchen and more time soaking up the sun with loved ones. I promise you, once you set this stunning dessert on the table, it will become the star of every occasion. The vibrant colors alone are enough to draw everyone in, but it’s the incredible combination of flavors that will have them coming back for seconds (and thirds!).
No Bake Summer Berry Lasagna: A Refreshing Delight for Warm Days
If you’re ready to dive into this culinary adventure and create something truly extraordinary, let’s gather our ingredients and get started! This No Bake Summer Berry Lasagna is all about simplicity without compromise—each component plays its part beautifully to create a harmonious symphony of flavors that will leave everyone raving about your skills in the kitchen.
Ingredients:
As we embark on this delicious journey together, let’s take a moment to appreciate each ingredient we’ll use. Every single one contributes uniquely to our mouthwatering masterpiece.
- 1 and 2/3 cup heavy cream, chilled. This liquid gold is absolutely paramount for achieving that rich and luscious texture we crave in desserts. The high-fat content creates an airy whipped cream that adds a luxurious mouthfeel to our lasagna layers. Make sure it’s cold—this helps it whip up beautifully so that you’re left with clouds of sweetness rather than soup!
- About 1/3 cup powdered sugar (to taste). Sweetness can be quite subjective, and using powdered sugar gives us that fine sweetness without any gritty texture. It dissolves easily into our whipped cream, allowing us to achieve just the right level of sweetness without overpowering those beautiful berries.
- 1 teaspoon vanilla. This unassuming little ingredient is what elevates our dish from ordinary to extraordinary. Vanilla adds depth and warmth, complementing the tartness of our berries beautifully. Always opt for pure vanilla extract if possible; it brings such an authentic flavor compared to synthetic options.
- 3 cups graham cracker crumbs. These crumbs form the base layer for our lasagna—think of them as a cozy blanket holding everything together! Their natural sweetness and buttery flavor perfectly contrast with the creamy layers above. When buying graham crackers, look for ones made with whole grains for added texture and flavor.
- ¼ cup strawberry jam. This jam serves not only as an additional flavor enhancer but also as glue between layers, ensuring everything stays intact while providing bursts of fruity goodness throughout each slice. Feel free to use homemade jam if you have some on hand; it adds such a personal touch!
- ½ cup + 2 tablespoons unsalted butter, melted. Butter is essential here as it binds our graham cracker crumbs into a cohesive crust that won’t crumble apart when served—definitely non-negotiable! Be sure to use unsalted butter so you can control the overall saltiness of your dessert more precisely.
- Red gel food coloring. While not necessary for flavor, this adding makes our dessert visually stunning! Just a drop or two mixed into your strawberry jam transforms it into vibrant layers that are sure to impress your guests.
- ½ cup unsalted butter, softened. We’ll need this butter at room temperature for creaming with cream cheese later—it creates an incredible texture that’s light yet creamy at the same time! Ensure it’s soft enough so it blends seamlessly without clumps.
- 8 oz cream cheese, softened. Cream cheese adds richness and tanginess; it’s what gives us that classic cheesecake layer we’re after! Softening it beforehand ensures no lumps remain—you want everything smooth and creamy for those perfect bites.
- 1 cup powdered sugar (again). Here we go again with powdered sugar! It sweetens our cream cheese layer while also contributing structure and stability to keep everything in place as it chills.
- 1 teaspoon vanilla (yes again!). The repetition here shows how vital vanilla is—each layer deserves its touch of this fragrant essence!
- 2/3 cup diced fresh strawberries. Fresh strawberries bring brightness both visually and flavor-wise—they’re juicy little gems bursting with summer’s essence! Look for ripe ones with no blemishes; they should smell fragrant and sweet when you pick them out.
- 1 cup whipped cream, freshly made or store-bought if you’re short on time—though I encourage making your own if possible! Nothing compares; homemade whipped cream has such incredible flavor and lightness compared to its packaged counterpart.
- 2 (3 oz package) berry blue Jello (or other flavor). Jello layers add fun textures while infusing color throughout our creation—it becomes an unexpected surprise when cut into squares! You could substitute different flavors based on what fruits you’ve chosen too!
- 1 and 1/4 cups boiling water. The hot water activates gelatin from Jello quickly; it helps dissolve any granules fully so they integrate smoothly into each layer—we don’t want any gritty surprises!
- 2 cups blueberry pie filling adds another layer of fruitiness along with richness from its syrupy base—it pairs beautifully with strawberries creating joyfully colorful contrasts.
- 1 cup canned crushed pineapple, drained from juice (or pulsed chunks). Pineapple brings delightful acidity cutting through sweetness while also adding moisture—look for canned varieties packed in juice rather than syrup!
- 2 ½ cups whipped cream, again making sure we have enough fluffiness throughout every delectable bite—it’s important we don’t skimp here!
- Fresh strawberries halved, used primarily for decoration but also providing freshness upon serving—their bright red color contrasts wonderfully against everything else!
- Fresh blueberries, another gorgeous topping option—their bursty juiciness rounds out flavors brilliantly while enticing eyes towards their lovely hues!
- ¼ cup chocolate chips, optional but highly encouraged because who doesn’t love chocolate? Sprinkle these beauties atop your finished dessert before serving for an extra touch of decadence!
Equipment You’ll Need:
Gathering the right tools can make all the difference in creating your No Bake Summer Berry Lasagna smoothly and successfully—it’s like having trusted friends beside you in the kitchen! While they may not be ingredients themselves, these essential partners will help bring your vision to life effortlessly.
- Mixing bowls (various sizes) – Having several mixing bowls handy allows you to keep things organized as we build layers without cross-contaminating flavors—a must-have when multitasking through multiple components!
- Electric mixer or whisk – An electric mixer makes whipping heavy cream or creaming butter easier than ever—saving time while ensuring maximum fluffiness! If you prefer whisking by hand though—that works too; just be patient as it takes more muscle power!
- Measuring cups & spoons – Precision matters greatly when baking or crafting desserts; having accurate tools ensures we achieve desired results every time without guesswork involved.
- Spatula (silicone recommended) – Perfect for folding delicate mixtures like whipped cream into heavier components—we want gentle movements here so air doesn’t escape from all that lovely fluffiness created earlier!
- 9×13 inch baking dish or similar size pan – This vessel holds all those gorgeous layers together neatly while providing ample surface area for serving later—you want enough space so nothing overflows out onto countertops!
Now that we’ve gathered our ingredients and equipment let’s move ahead boldly into preparing this delightful No Bake Summer Berry Lasagna!
Step 1: Create Your Graham Cracker Base
To begin constructing this beautiful dessert masterpiece, start by combining your graham cracker crumbs with melted butter in one mixing bowl until every crumb is thoroughly coated—a process known as “binding.” The buttery richness here will give structure once pressed down firmly into your baking dish later on—the perfect foundation upon which all other layers rest securely! Use a spatula or even your hands if needed—this tactile interaction helps ensure even distribution throughout each crumb! Aim for consistency reminiscent of wet sand; it should hold together when squeezed gently but not overly moist either since we want crisp edges around each slice later on!
Once combined well enough—not too compacted though—transfer this mixture directly into your chosen baking dish then press evenly across bottom firmly using fingers or another flat tool like measuring cups’ bottom side ensuring uniformity across entire area—it’s crucial at this stage since any gaps mean less structural integrity later down line when layering occurs atop crust itself! Afterward pop it into fridge briefly allowing crust set properly while proceeding further since patience pays off big-time here leading ultimately toward success later down line…
Step 2: Whip That Cream!
Next up comes one of my favorite steps: whipping heavy cream until soft peaks form—a process akin almost poetic artistry unfolds before us now creating clouds destined delight tastebuds soon thereafter! Pour chilled heavy whipping cream straight into large mixing bowl alongside powdered sugar & vanilla extract previously mentioned earlier; these additions enhance both texture & taste alike bringing forth sweetness balanced harmoniously alongside richness inherent within base ingredient itself working together wonderfully produce something truly unforgettable once plated up finally later on too…
Using electric mixer fitted attach whisk attachment (or traditional whisk if feeling adventurous!) turn speed gradually increase until those soft peaks emerge gently lifting beaters slowly upwards revealing delicate fluffiness achieved through air incorporation during mixing itself—isn’t science amazing? At this point stop beating immediately following desired level achieved since over-whipping causes separation leading ultimately curdled mess—and trust me no one wants experience disappointment like that after effort put forth thus far…
Step 3: Prepare Your Cream Cheese Layer
Now let’s turn attention towards preparing creamy filling layer which requires blending softened block(s) cream cheese alongside remaining portion confectioner’s sugar plus second splash vanilla extract mentioned before too—we’re building depth here folks resulting richly satisfying texture next awaiting assembly awaits eagerly ahead still… Begin by placing aforementioned ingredients inside separate clean bowl then mix thoroughly until well-combined producing velvety-smooth consistency resembling slightly thickened frosting ideal consistency desired outcome leading toward ultimate satisfaction end result achieved altogether once served additionally layered atop cool graham cracker crust already established previously…
Once blended nicely scrape sides down ensuring nothing left behind remains hidden away neglected largely unnoticed within bowl itself—we want utilize every bit available effectively maximizing richness derived across entire creation outcome achieved ultimately tastier morsels enjoyed widely experienced among guests gathered around excitedly waiting patiently nearby anticipating their first bites made successful via efforts exerted thus far…
Step 4: Assemble Layers
At last comes momentous occasion assembling all gorgeous components painstakingly crafted thus far into harmonious ensemble ready nourish souls hungry eager experience joyous occasion together sharing laughter memories created through shared indulgence amongst loved ones gathered around celebrating moments worth cherishing forevermore… Begin by taking cooled prepared graham cracker crust then spoon generous dollops carefully laying smooth creamy filling evenly spread across top surface leaving edges untouched aiming maintain distinct visual appeal preserved beautifully contrasting colors layered attractively underneath subsequently following suit neatly thereafter …
Next sprinkle diced fresh strawberries evenly distributed across newly formed layer ensuring sweetness bursts forth upon tasting bites taken delightfully savoring juicy morsels harmonizing flawlessly alongside smoothness beneath enhancing overall experience exponentially heightening enjoyment level reached among diners eagerly awaiting opportunity sample delicacies created awaiting proudly showcase centerpiece assembled charmingly presented invitingly altogether blooming vibrantly beneath warm sunlight spilling gently illuminating surroundings filled laughter echoing softly throughout spaces embraced lovingly dear friends family members alike…
Final Touches: The Grand Finish
Step 9: Garnishing Your Gorgeous Creation
The moment has arrived for us to unveil our No Bake Summer Berry Lasagna from its cool hiding place in the refrigerator! Before serving this beauty, let’s add some finishing touches that not only elevate its aesthetic appeal but also enhance those delightful summer flavors we’re working with here. Start by whipping up an additional batch of whipped cream if desired—about 2 ½ cups would do nicely—and pipe generous swirls on top for an inviting look that’s simply irresistible.
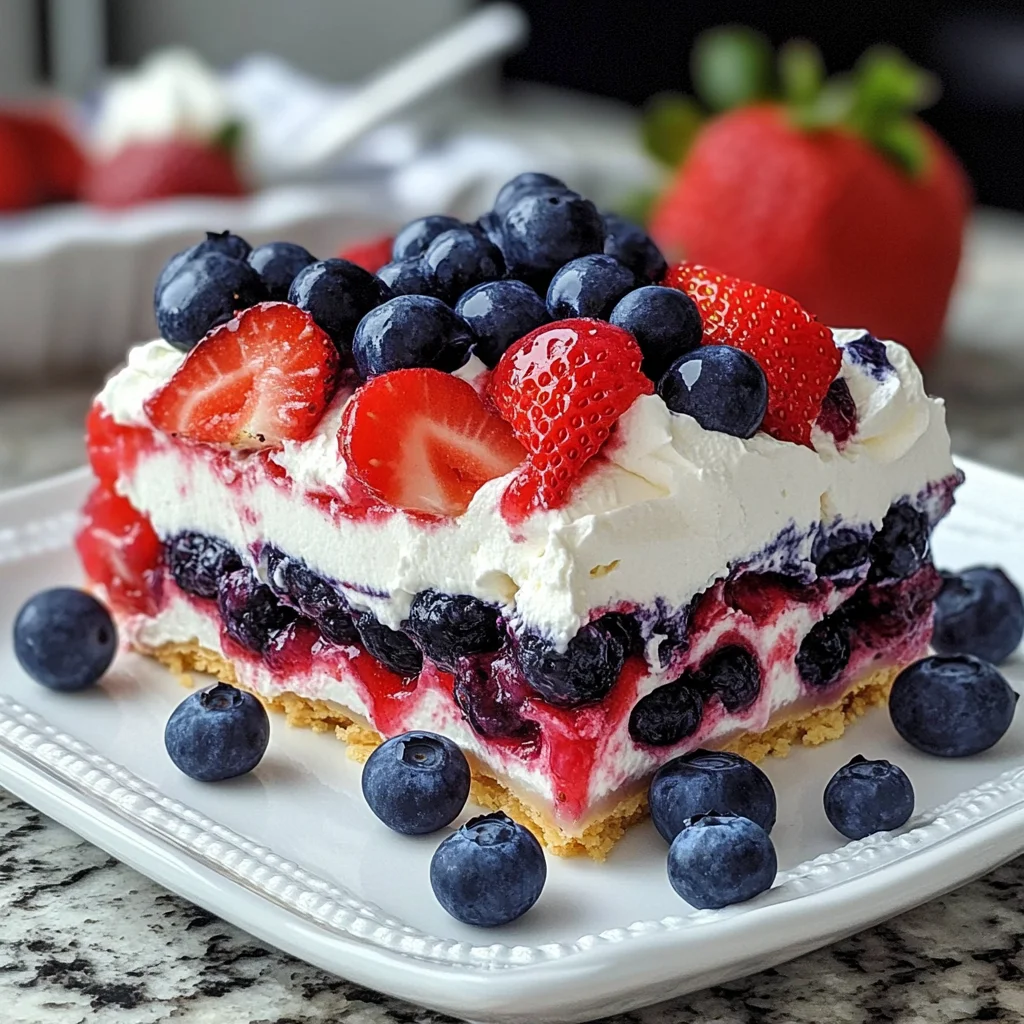
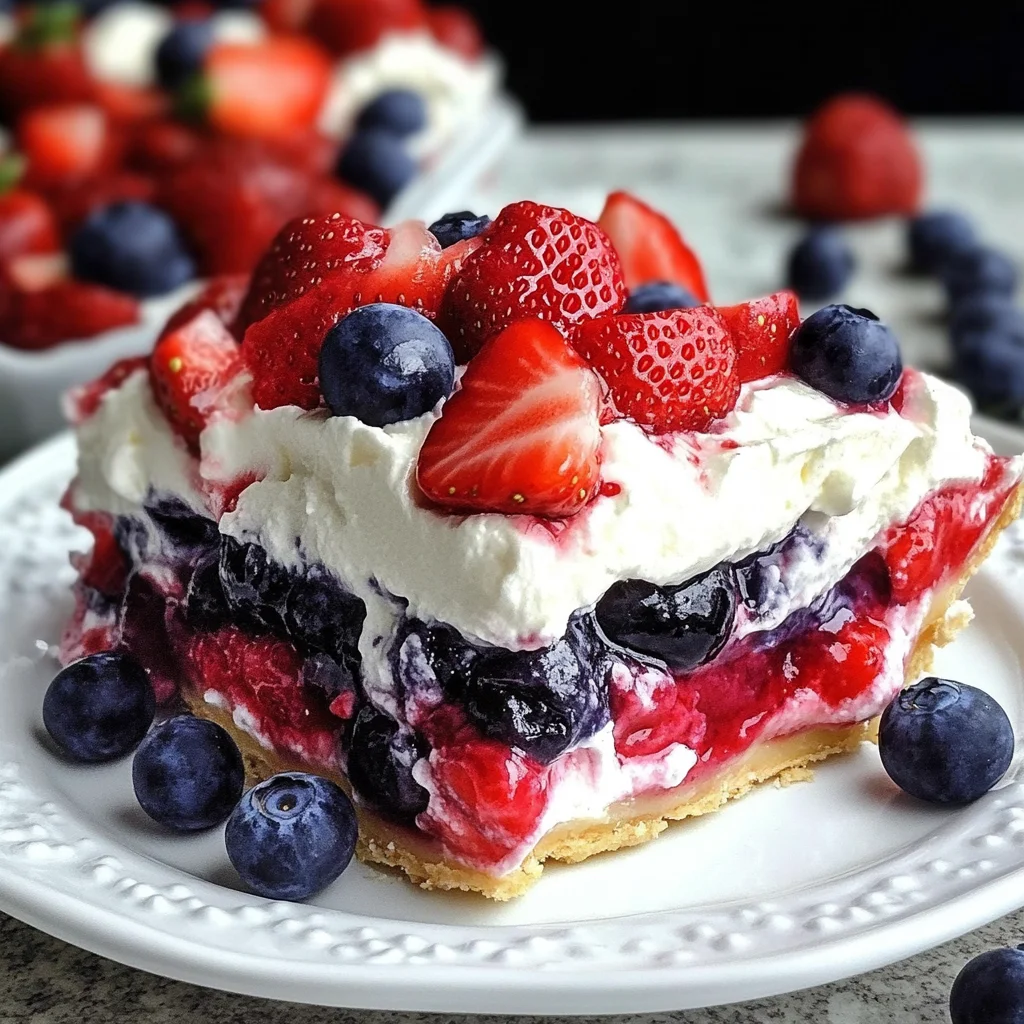
Now for some added flair! Scatter halved fresh strawberries and plump blueberries across your whipped topping; their vibrant colors contrast beautifully against white cream like jewels glistening in sunshine—a sight sure to captivate anyone who lays eyes on it! If you wish to sprinkle chocolate chips over top (about ¼ cup), they’ll add a delightful crunch along with bittersweet contrast against all those bright fruits—we’re talking about flavor fireworks here!
Finally, take pride as you slice into your creation; each cut reveals stunning layers full of color and texture waiting patiently beneath its surface. As you serve generous portions onto dessert plates—don’t forget to scoop up some berries from below—you’ll see how every layer harmonizes; it’s pure joy on a plate! I can assure you that each bite will transport everyone straight into summer bliss—the kind where laughter echoes around tables filled with friends and family enjoying life’s sweetest moments together. Enjoy making memories with every forkful!
Storage and Enjoyment Tips for Your No Bake Summer Berry Lasagna
Now that you’ve created this beautiful, refreshing No Bake Summer Berry Lasagna, it’s time to sit back, relax, and enjoy every bit of your hard work! This dessert is not just a feast for the eyes; it’s an absolute symphony of flavors that dances on the palate. But what if you find yourself with some leftovers? Fear not! Storing this delightful creation properly will ensure you can savor its deliciousness long after the last guest has left.
Storing Leftover No Bake Summer Berry Lasagna
To keep your No Bake Summer Berry Lasagna fresh and enjoyable, I recommend using an airtight container. This will protect it from absorbing any unwanted odors from your fridge while also keeping it moist and creamy. Ideally, store it in the refrigerator where it will stay good for about 3 to 5 days, but trust me—you’ll want to dig into those layers much sooner! To maintain its delightful texture and flavor, consider placing a slice of bread inside the container; this simple trick works wonders in preventing any excess moisture loss. As for how it tastes after storage? Oh, my friends, you’re in for a treat! The flavors meld beautifully overnight, creating an even more profound taste experience that will have you coming back for seconds—if there are any left! When you’re ready to serve again, simply scoop out a piece and let it stand at room temperature for a few minutes so the luscious layers can soften slightly.
Freezing Components for Later
If you want to prepare ahead or save some portions for later indulgence, freezing is a fantastic option! To freeze your No Bake Summer Berry Lasagna effectively, slice it into individual portions and wrap each piece tightly in plastic wrap before placing them into a freezer-safe container or bag. This method will help preserve its exquisite layers and flavors without compromising quality. It’s best enjoyed within 2 to 3 months of freezing, ensuring you maintain that fresh-from-the-fridge taste. When you’re ready to enjoy a slice from frozen, simply transfer it to the refrigerator overnight to thaw gently—no need for heating up here! The convenience of having this delectable dessert on hand means you can whip out a slice whenever cravings strike or when unexpected guests drop by. Trust me; it’s pure bliss to know you have such a delightful treat waiting for you!
No Bake Summer Berry Lasagna

No Bake Summer Berry Lasagna is the quintessential dessert for warm days, combining creamy layers and fresh, vibrant berries without any baking required. This delightful treat features a luscious cream cheese filling sandwiched between buttery graham cracker crumbs and topped with colorful layers of strawberries and blueberries. Perfectly easy to prepare, this dessert allows you to enjoy sunny gatherings with family and friends while indulging in a refreshing, sweet celebration of summer. Its beautiful presentation and delightful flavors make it a showstopper at any event!
- Prep Time: 30 minutes
- Cook Time: 0 minutes
- Total Time: 30 minutes
- Yield: Serves approximately 12 1x
- Category: Dessert
- Method: No bake
- Cuisine: American
Ingredients
- 1 and 2/3 cup heavy cream, chilled
- About 1/3 cup powdered sugar (to taste)
- 1 teaspoon vanilla extract
- 3 cups graham cracker crumbs
- ½ cup + 2 tablespoons unsalted butter, melted
- 8 oz cream cheese, softened
- 1 cup powdered sugar
- 2/3 cup diced fresh strawberries
- 1 cup whipped cream, freshly made or store-bought
- 2 (3 oz package) berry blue vegan Jello
- 1 and 1/4 cups boiling water
- 2 cups blueberry pie filling
- 1 cup canned crushed pineapple, drained
- Fresh strawberries halved
- Fresh blueberries
- ¼ cup chocolate chips (optional)
Instructions
- In a mixing bowl, combine graham cracker crumbs and melted butter until evenly coated. Press into the bottom of a 9×13 inch baking dish to form the base layer.
- Whip heavy cream with powdered sugar and vanilla extract until soft peaks form.
- In another bowl, blend softened cream cheese with powdered sugar and vanilla until smooth. Fold in half of the whipped cream and diced strawberries.
- Spread half of the cream cheese mixture over the graham cracker crust, followed by half of the blueberry pie filling.
- Repeat the layers: graham crackers, cream mixture, and blueberry filling until all ingredients are used.
- Cover and refrigerate for at least 3 hours or overnight for best results.
Nutrition
- Serving Size: 1 serving
- Calories: 320
- Sugar: 24g
- Sodium: 150mg
- Fat: 18g
- Saturated Fat: 10g
- Unsaturated Fat: 6g
- Trans Fat: 0g
- Carbohydrates: 36g
- Fiber: 2g
- Protein: 4g
- Cholesterol: 40mg