Air Fryer Blooming Onion
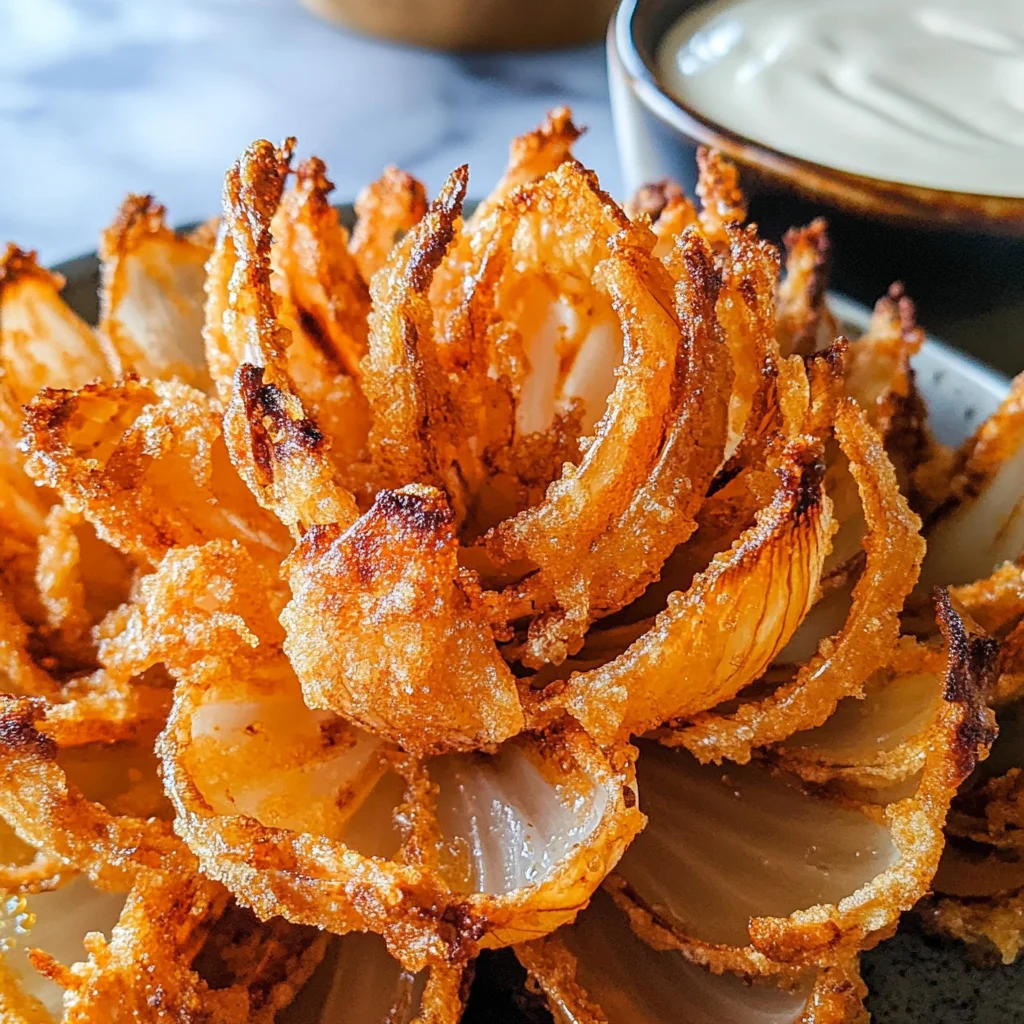
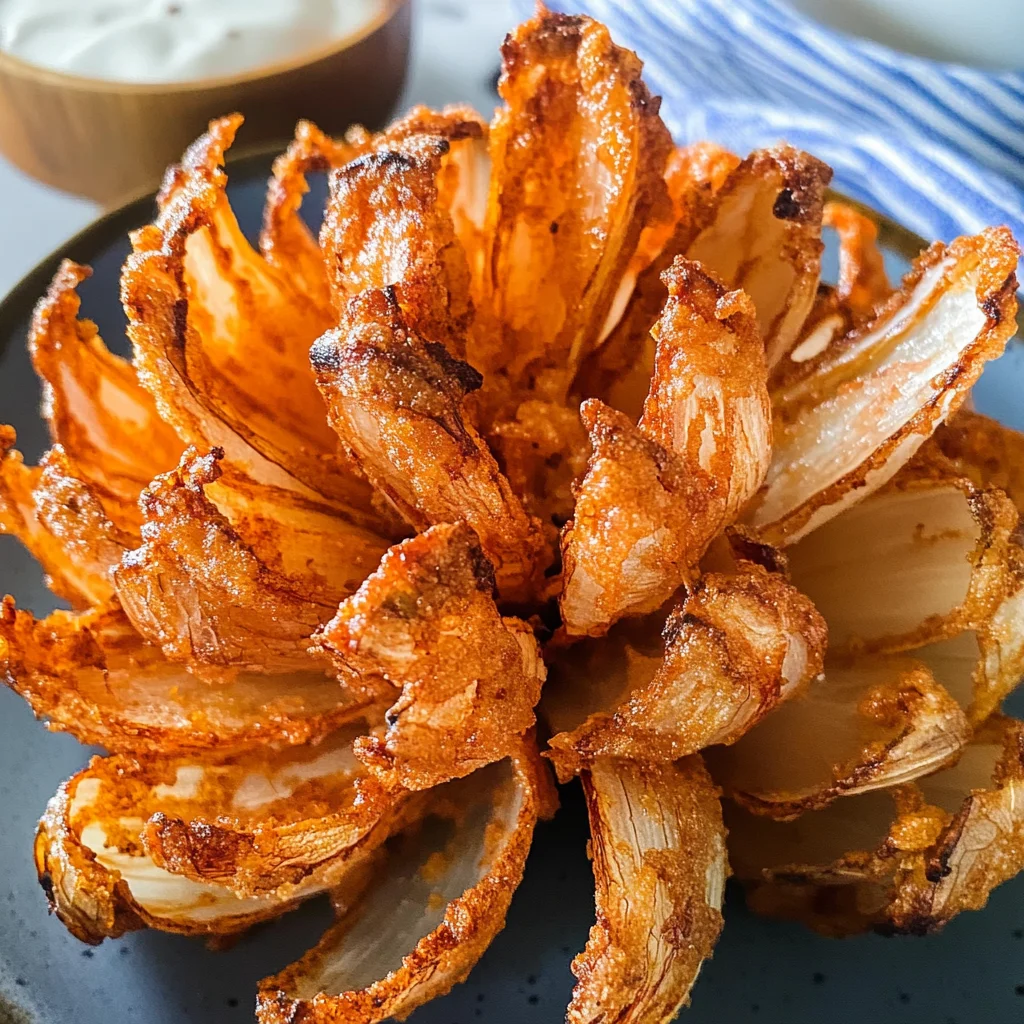
There’s something utterly enchanting about transforming a simple onion into a stunning, artfully crafted appetizer that beckons to be shared. The Air Fryer Blooming Onion is not just food; it’s an experience that unites friends and family around the table, igniting laughter and conversation with each crispy petal that pulls apart. I’ve always been captivated by the way this dish, with its golden-brown exterior and tender interior, manages to make even the simplest gatherings feel like a special occasion. The fragrant spices waft through your kitchen as it cooks, creating an aroma that’s almost intoxicating, making it impossible for anyone to resist this delectable creation. Trust me when I say, this recipe will become a cherished favorite in your home.
As we embark on this culinary journey together, let’s take a moment to appreciate the magic of the blooming onion. This dish has a fascinating history rooted in American cuisine, often gracing menus as an irresistible appetizer. It’s perfect for game days, cozy family movie nights, or any gathering where comfort food reigns supreme. What makes this Air Fryer Blooming Onion truly extraordinary is how it marries traditional flavors with modern cooking techniques — all while keeping things light and healthier than deep-frying ever could! So roll up your sleeves because I promise you, once you master this recipe, there will be no turning back!
Air Fryer Blooming Onion: A Crispy Delight Awaits
Let’s dive right into the heart of this recipe! Making an Air Fryer Blooming Onion at home is not only rewarding but also a delightful way to impress your loved ones. The air fryer offers a unique twist on this classic dish by achieving that perfect crunch without submerging everything in oil. As we prepare to create this culinary masterpiece together, you’ll find that every step is infused with love and care.
Ingredients:
Before we get started on our blooming onion adventure, let me introduce you to the ingredients that will elevate our dish from ordinary to extraordinary.
- 1 large sweet onion. Choosing the right onion is crucial for achieving that sweet flavor profile we want in our blooming onion. Sweet onions like Vidalia or Walla Walla are fantastic options because they have a mild taste that balances perfectly with our spice blend. When selecting your onion, look for one that feels heavy for its size and has smooth skin free from blemishes or soft spots; these are signs of freshness.
- 2 ½ cups all-purpose flour. This ingredient serves as the backbone of our breading process. It’s what gives our blooming onion that beautiful golden crust you can’t resist! All-purpose flour absorbs moisture from the onion and helps bind our spices to it effectively. If you’re looking for gluten-free alternatives, feel free to swap in a blend designed for all-purpose use — just be mindful of adjustments needed in moisture content.
- 1 tablespoon paprika. Adding paprika not only infuses color into your dish but also contributes a subtle sweetness and smokiness that’s absolutely delicious! The vibrant red hue enhances visual appeal while complementing the natural sweetness of the onion itself. For an extra kick, consider using smoked paprika instead; it adds depth and complexity that will leave everyone guessing what your secret ingredient is!
- 1 teaspoon cayenne pepper. This little powerhouse packs heat without overwhelming the palate. Just one teaspoon brings warmth to each bite and enhances all other flavors beautifully! If you’re sensitive to spice or serving guests who might prefer milder flavors, feel free to reduce the amount or even omit it entirely — I promise you won’t lose out on deliciousness.
- ½ teaspoon ground cumin. Cumin adds an earthy depth that makes your taste buds dance with joy! It brings warmth and richness to our spice blend while complementing both sweet and savory notes of the onion itself marvelously.
- ½ teaspoon dried thyme and ½ teaspoon dried oregano (you can combine these two). These herbs bring brightness and aromatic qualities that elevate our dish beyond mere fried food into something truly special! Thyme lends subtle floral notes while oregano provides hints of earthiness — together they create an aromatic experience that’s both comforting and familiar.
- 2 large eggs. Eggs play a pivotal role in creating a light batter around our blooming onion by acting as a binding agent during breading. They help everything adhere beautifully while adding richness and flavor throughout each petal.
- 1 cup milk & 1 cup water combined into our egg mixture create a luscious wash that ensures thorough coating without overpowering other flavors in our dish. The water helps thin out the mixture so it’s easy to work with while also allowing those spices to shine through!
- Salt and pepper to taste are non-negotiable essentials! They enhance all flavors present in our dish elevating each bite from good to unforgettable; don’t forget them!
- Oil in a spray bottle is crucial for achieving that crispy texture we crave while keeping things lighter than traditional frying methods allow—this small detail makes all the difference! A light mist ensures even browning without excess grease weighing down those glorious petals.
With all these ingredients gathered together like old friends ready for reunion time spent preparing will fly by; now let’s explore what tools will make this cooking experience even more enjoyable!
Equipment You’ll Need:
Having the right tools makes every cooking adventure smoother and oh-so-much more enjoyable! While these items may not be ingredients, they are essential partners in crafting your Air Fryer Blooming Onion masterpiece.
- Air fryer – This magical appliance is non-negotiable when it comes to making perfectly crisped food with less oil than traditional frying methods require! The air fryer circulates hot air rapidly around your food creating an even cook without sacrificing flavor or texture—what’s not to love about that? If you don’t have one yet though no worries there are alternative baking methods available too!
- Large mixing bowl – A sturdy mixing bowl allows ample space for whisking ingredients together smoothly ensuring every element blends seamlessly (and there’s nothing worse than messy splatters everywhere!). Opt for one made of glass or stainless steel since these materials resist staining over time allowing you peace-of-mind during cleanup later on!
- Medium deep bowl – This smaller counterpart holds our egg mixture perfectly allowing easy access when dipping those carefully prepared petals without any messiness involved—trust me—they’ll thank you later!
- Aluminum foil – Not just for wrapping leftovers anymore! In this case, aluminum foil creates an ingenious sling enabling effortless transfer of your blooming onion into/out from fryer basket minimizing risk of breakage during cooking process—it’s truly invaluable here!
Now that we’re armed with knowledge let’s dive into preparing our Air Fryer Blooming Onion together — get ready for some serious culinary fun ahead!
Step 1: Crafting Your Bloom
The first step in creating this stunning dish involves slicing your sweet onion just right so its petals blossom beautifully when cooked! Start by cutting off about half an inch from the top of your onion; this allows us access into its inner layers while still leaving enough intact at its root which binds everything together nicely during cooking time! Next peel away any papery outer skin revealing those shiny layers beneath—this transformation alone is already exciting isn’t it?
Now place your peeled onion cut-side down onto a sturdy cutting board; beginning roughly half an inch upward from its root end make downward cuts straight through until they hit board below—this technique creates those lovely petal-like sections we admire so much when served up fresh hot from air fryer later on! Repeat forming four evenly spaced cuts around entire circumference until you achieve sixteen petals total—this part may seem daunting initially but have patience as each slice unveils more beauty within!
Once complete gently flip over onto its base allowing those lovely petals some time (about five minutes) to relax before moving forward—it’s well worth waiting just trust me here—the results will astound everyone involved!
Step 2: Whisk Away!
Now comes my favorite part—creating flavorful coatings bursting forth with spices ready-to-cloth each delicate layer awaiting their fate inside air fryer embrace! In a large mixing bowl combine measured amounts flour along with paprika,cayenne pepper,cumin,dried thyme,dried oregano,salt & pepper whisk thoroughly until uniform consistency achieved (think silky smooth)—this mix isn’t merely decorative—it delivers rich flavors penetrating every petal enhancing overall enjoyment immensely later on!
In another medium deep bowl take those two eggs crack ‘em open then add milk alongside water whisk vigorously until frothy creating luscious wash perfect coat awaiting next step—this consistency ensures optimal adhesion between dry mixture & wet ensuring thorough coverage across entire surface area—a crucial aspect overlooked sometimes leading unfortunate results if neglected entirely!
Step 3: Dressing Up Our Darling
Alright my friend let’s get hands-on here—we’re going fully immersive now by dressing up darling blooming onion piece-by-piece starting first by placing it gently inside clean bowl cut-side up before pouring generous ladleful of flour mixture atop allowing gravity do its thing gently coaxing flakes through petal gaps reaching depths previously untouched—use large spoon if necessary helping process along ensuring full coverage throughout entire structure visibly noticeable post-cooking too!
Once coated flip over delicately patting off excess flour gently avoiding disruption among lovely layers formed earlier—don’t worry too much about perfection here since any leftover bits help contribute textural contrast which brings depth upon final reveal once plated up alongside dip served nearby hopefully causing mouths watering like crazy instantly upon sight alone—not rushing key here either take time savor moments spent prepping knowing reward awaits shortly thereafter…
Step 4: Double Dipping Fun
Next transfer dressed-up ornament back into egg wash ensuring even coating across surface area removing excess drips afterward before returning again into reserved flour mixture repeating same previous technique discovered earlier—gently tapping off any stubborn excess afterwards leaving behind slight remnants clinging tightly offer additional crunch factor during cooking process later should they remain visible at point serving too—a teeny sprinkle salt/pepper now leads us closer towards magical transformation ahead once everything settles properly together after chilling briefly beforehand….
By following through these steps diligently soon enough aromas waft throughout kitchen promising blissful experience await everyone gathered around table sharing stories laughter matchmaking hearts around warm glow radiating from oven bringing life back home again fully restored happiness reminding us why gathering matters most especially times such as these…
I can hardly wait till next step awaits us as anticipation builds stronger feeling excitement bubbling high within unity shared amongst friends gathering together enjoying wonderful food moments created lovingly crafted memories made lasting forevermore guaranteed happiness ringing true shining brightly illuminating paths forward toward further exploration culinary delights await beyond horizons stretching far wide opening doors inviting tastes unknown leading journeys endless possibilities lying ahead…
Step 5: Gently Unfurling Your Onion’s Petals
This step is where the magic of the Air Fryer Blooming Onion begins to take shape, and I promise you, it’s a joy! After letting your beautifully cut onion rest for about five minutes with its cut side facing down, it’s time to gently coax those petals apart. Using your fingers, carefully separate the outer layers just a bit—this isn’t just for aesthetics; it ensures that every nook and cranny gets coated in that delicious flour mixture. Think of this step as giving your onion a little TLC, allowing it to relax and prepare for the delightful transformation it’s about to undergo. It’s crucial to be gentle here; after all, we want the onion to maintain its integrity while blooming into a glorious display. If you rush through this part or apply too much pressure, you might end up with a sad, broken onion rather than a stunning centerpiece for your appetizer spread.
Step 6: The Flour Mixture Magic
Now let’s dive into our flavorful coating! In a large bowl, whisk together 2 ½ cups of all-purpose flour along with a tablespoon of paprika, one teaspoon of cayenne pepper, half a teaspoon each of ground cumin, dried thyme, and dried oregano. This aromatic blend is what elevates your Air Fryer Blooming Onion from ordinary to extraordinary. The spices will not only provide flavor but also contribute to that coveted golden-brown crust when cooked. Don’t skip on seasoning—salt and pepper are essential here! They will enhance the natural sweetness of the onion and bring everything together beautifully.
In another medium-sized bowl, whisk together two large eggs with one cup of milk and one cup of water until fully combined. This mixture acts like glue for our flour coating—it’s what helps the flour stick to the onion’s petals during frying. Remember, consistency matters here! Too runny or too thick can affect how well your coating adheres. You want it to be smooth and slightly frothy; think of it as liquid gold waiting to transform your blooming onion into something truly special!
Step 7: Coating Your Onion with Love
Let’s get messy! Place your prepared onion in a clean bowl cut-side up—a perfect little vessel ready for its transformation. Pour that fantastic flour mixture generously over the top of the onion, ensuring every single petal receives an ample coat. Use a large spoon to press the flour into those delicate layers—this is where patience pays off! By really getting in there between those petals with the flour mix, you are ensuring that every bite will have flavor and crunch.
Once you’ve given it a good coat on top, flip the onion over carefully and give it a gentle pat to remove any excess flour. Make sure you don’t skip this step; otherwise, you’ll end up with clumpy bits instead of that beautiful uniformity we’re aiming for! Now comes an important part: transferring the onion into our egg mixture for another round of love. This double-dipping technique is absolutely paramount for achieving that crispy texture we all crave!
Step 8: The Egg Bath Bliss
After patting off excess flour from your first dip, carefully lower your coated onion into the egg mixture. This step allows the egg wash to envelop every petal—just like wrapping them in a warm hug before they enter their hot air fryer bath! Let any excess drip off before returning it back into that reserved flour mixture for another coat. Yes, we’re doing this twice because trust me on this: double-coating helps create an ultra-crunchy exterior that is simply irresistible.
Make sure you shake off any extra flour again—too much can lead to uneven cooking or burnt spots later on. This process may seem tedious at first glance but allow me to emphasize how transformative it truly is; each layer contributes depth and texture that will make your guests swoon when they take their first bite! Once you’ve completed this double-dip dance (and yes, I know it can be messy), set aside your lovingly coated onion in the refrigerator while we prepare our air fryer.
Prepping Your Air Fryer for Success
Step 9: Preheating Perfection
Now it’s time for an essential phase—the preheating of our trusty kitchen companion, the air fryer! Preheat your air fryer at 350ºF (about 175ºC) for approximately ten minutes. Why preheat? Well, think of it like warming up before running a race; it allows all components within the fryer to reach optimal cooking temperature evenly before introducing our star ingredient—the blooming onion! Not preheating can lead to uneven cooking or soggy spots—something we definitely want to avoid when aiming for crispy perfection.
As you await that perfect temperature (which fills your kitchen with anticipation), take this moment to reflect on all that hard work you’ve put into creating this masterpiece so far! Visualize how glorious it will look once it’s finished—a stunning golden bloom ready for dipping!
Step 10: The Grand Frying Adventure
With our air fryer perfectly preheated and our fragrant onion ready from its chilly slumber in the fridge, it’s time for action! Carefully remove your coated onion from refrigeration and spritz generously with vegetable oil from your spray bottle; don’t skimp on this part as oil is key in achieving that crispy outer layer without deep frying.
Using aluminum foil shaped into a sling will make transferring easier—trust me on this one; no one wants their hard work falling apart at this stage! Place the onion cut side up in the basket gently (it’s like placing a crown on its throne). Set your timer for twenty-five minutes; during this time magic happens as hot air circulates around every petal infusing flavor while creating an irresistible crunch.
Midway through cooking—around twelve or thirteen minutes in—give it some love by spraying additional oil onto any visible dry spots or areas still covered lightly with flour. This ensures even browning across all layers so they become beautifully crisped without burning or sticking together.
Step 11: The Moment of Truth
When those twenty-five minutes are up (and oh my goodness does it smell heavenly), carefully lift out your blooming creation using that trusty aluminum foil sling again—it may look fragile but trust me; it’s resilient! Season generously yet thoughtfully with salt and pepper while still warm—this final touch enhances all those lovely flavors you’ve built throughout each step.
Now comes perhaps one of my favorite parts—the presentation! Serve immediately alongside that delightful blooming onion dip you’ve prepared ahead (you do have something fabulous planned for dipping purposes right?). Gather around with friends or family as everyone eagerly takes turns pulling apart those glorious petals—it truly embodies comfort food at its finest.
Remember how much love went into making this dish—from selecting fresh ingredients down through every careful step leading here today? It’s worth celebrating both visually and taste-wise—and once shared among loved ones? Absolutely unforgettable!
So there you have it—the complete guide towards crafting an unforgettable Air Fryer Blooming Onion right at home—a fun appetizer bursting with flavor that will impress anyone lucky enough to indulge in its glory! Enjoy every moment spent creating this dish because I assure you—the smiles on everyone’s faces will make it all worthwhile! Happy cooking!
Storage and Enjoyment Tips for Your Air Fryer Blooming Onion
Now that you’ve watched your masterpiece come to life in the air fryer, it’s time to revel in the joy of enjoying your Air Fryer Blooming Onion! The aroma wafting through your kitchen is just a tantalizing preview of the incredible flavors that await you. But what if there are leftovers? Fear not! This delightful dish can be enjoyed even after the first round. Let’s dive into how to preserve its deliciousness for another day while maintaining that crispy texture and bold flavor.
Storing Leftover Air Fryer Blooming Onion
To store any leftover pieces of your glorious blooming onion, simply place it in an airtight container—this is non-negotiable for keeping that signature crunch intact! Store it in the refrigerator where it will stay fresh for about 2-3 days. For best results, I recommend placing a slice of bread inside the container; this little trick absorbs excess moisture and helps maintain that crave-worthy crispiness! After a couple of days in the fridge, you might notice a slight dip in texture, but fear not—the flavor remains as vibrant as ever. When you’re ready to indulge again, reheat it in your air fryer at 350°F for just a few minutes until it’s warm and crispy once more. Trust me on this: your taste buds will thank you!
Freezing Your Air Fryer Blooming Onion for Later
If you want to take your blooming onion game to the next level, consider freezing portions for those spontaneous snack attacks or last-minute gatherings! To freeze properly, wrap the cooled onion tightly in plastic wrap and then place it in a freezer-safe bag or container; this double-layer protection is key to preventing freezer burn. Your blooming onion will keep well frozen for up to three months without losing much of its charm. When you’re ready to enjoy it again, simply let it thaw in the refrigerator overnight and then reheat as mentioned earlier. This make-ahead option not only saves time but also ensures that when cravings strike, you’re just minutes away from savoring those incredible flavors again!
Air Fryer Blooming Onion
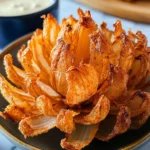
Air Fryer Blooming Onion is a delightful twist on the classic appetizer that turns a simple sweet onion into a stunning centerpiece for any gathering. With its golden-brown, crispy petals and tender interior, this dish invites friends and family to share in laughter and conversation. The air fryer method ensures you achieve that perfect crunch without the excess oil of traditional frying, making it a healthier option that’s still packed with flavor. Ideal for game days, movie nights, or casual get-togethers, this recipe is bound to become a cherished favorite in your home.
- Prep Time: 20 minutes
- Cook Time: 25 minutes
- Total Time: 45 minutes
- Yield: Serves approximately 4
- Category: Appetizer
- Method: Frying
- Cuisine: American
Ingredients
- 1 large sweet onion (like Vidalia or Walla Walla)
- 2 ½ cups all-purpose flour
- 1 tablespoon paprika
- 1 teaspoon cayenne pepper
- ½ teaspoon ground cumin
- ½ teaspoon dried thyme
- ½ teaspoon dried oregano
- 2 large eggs
- 1 cup milk
- 1 cup water
- Salt and pepper to taste
- Oil in a spray bottle
Instructions
- Preheat your air fryer to 350°F (175°C).
- Cut the top off the onion and peel away the outer layers. Place it cut-side down on a cutting board and make downward cuts to create petal sections.
- In a large bowl, combine flour, paprika, cayenne pepper, cumin, thyme, oregano, salt, and pepper.
- In another bowl, whisk together eggs, milk, and water until frothy.
- Coat the onion with the flour mixture, dip in the egg wash, then coat with flour again.
- Spray the coated onion generously with oil and place it cut-side up in the air fryer basket.
- Cook for approximately 25 minutes or until golden brown and crispy.
Nutrition
- Serving Size: 1 blooming onion (approximately 200g)
- Calories: 340
- Sugar: 2g
- Sodium: 450mg
- Fat: 6g
- Saturated Fat: 1g
- Unsaturated Fat: 4g
- Trans Fat: 0g
- Carbohydrates: 66g
- Fiber: 4g
- Protein: 9g
- Cholesterol: 70mg