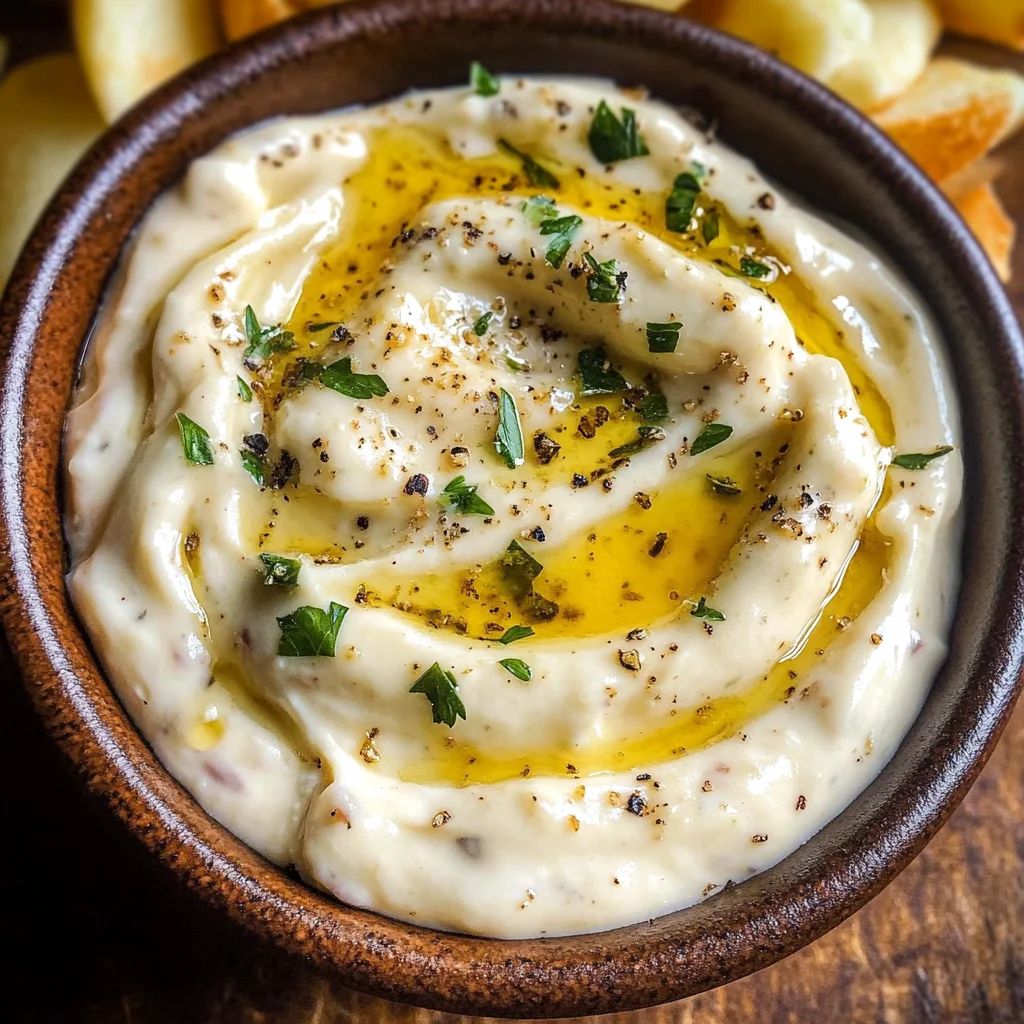
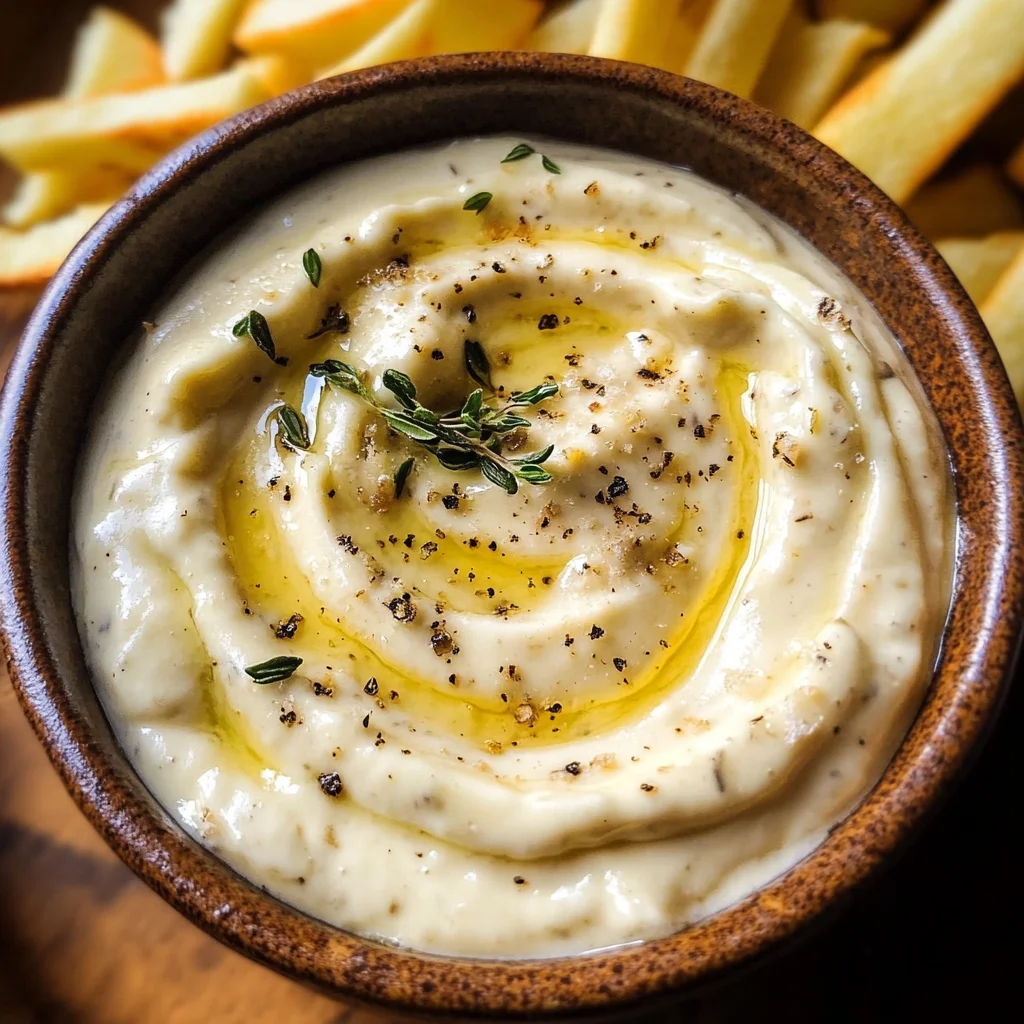
Garlic Aioli Recipe
There’s something truly magical about the art of cooking, especially when it comes to crafting a simple yet utterly divine condiment like garlic aioli. This isn’t just any sauce; this is liquid gold that elevates your meals from mundane to extraordinary. The creamy texture, infused with the fragrant essence of garlic and a hint of zesty lemon, creates a symphony of flavors that is simply irresistible. Whether you’re dipping fresh veggies, slathering it on a sandwich, or pairing it with grilled meats, this Garlic Aioli Recipe will soon become a beloved staple in your kitchen. I promise you, once you experience that first taste, you’ll understand why this recipe is not just about food—it’s an experience that brings people together.
One of the beautiful things about aioli is its versatility and simplicity. It embodies a bridge between traditional Mediterranean flavors and contemporary American cuisine. It’s perfect for casual gatherings or elegant dinner parties alike—any occasion where you want to impress without overwhelming yourself in the kitchen. Just imagine how wonderful it feels to present your friends and family with a homemade aioli that they can dip their crispy vegetables into or spread generously on their sandwiches! There’s joy in sharing something that you’ve made with love, and as you whip up this Garlic Aioli Recipe, you’ll realize it’s not just about combining ingredients; it’s about creating moments filled with laughter and connection.
Garlic Aioli Recipe: A Simple Condiment That Packs a Punch
If you’re ready to embark on this delightful culinary journey, let’s dive right into making this incredible garlic aioli! With only five ingredients and minimal prep time, you’ll see just how easy it is to create something profound. Each component plays an essential role in crafting this delicious dip that enhances whatever dish it accompanies.
Ingredients:
As we gather our ingredients for this Garlic Aioli Recipe, let me assure you that each one has been thoughtfully chosen to contribute to the overall flavor profile and texture of our aioli.
- 1/2 cup mayonnaise. Mayonnaise serves as the creamy base of our aioli; it’s what gives our sauce its luscious texture. When selecting mayonnaise, look for high-quality brands made with simple ingredients—egg yolks, oil, vinegar or lemon juice—as these will yield the best results. Alternatively, if you’re feeling adventurous or need a vegan option, you can use an eggless mayonnaise or even make your own using aquafaba (the liquid from canned chickpeas) for a lighter touch without losing creaminess.
- 1 large garlic clove (minced). Ahh, garlic—the heart and soul of our aioli! Freshly minced garlic infuses our sauce with depth and warmth. When chopping garlic, don’t rush; take your time to coax out those natural oils that give off such an intoxicating aroma. If you’re sensitive to raw garlic’s potency but still desire its flavor essence, consider roasting the clove first—it will mellow out beautifully while adding sweetness.
- 1/2 tsp stone ground mustard. This may seem like a small amount, but trust me—this ingredient is absolutely paramount! Stone ground mustard adds an exciting tangy kick that balances the richness of the mayonnaise while also enhancing the overall complexity of flavors in our aioli. You can substitute it with Dijon mustard if needed; just note that it has a smoother texture and slightly different taste profile.
- 2 tsp lemon juice. Fresh lemon juice brightens everything up! It cuts through the richness of the mayonnaise and brings balance—not only does it add acidity but also imparts freshness which is crucial for elevating all those wonderful flavors we’ve created so far. Always opt for freshly squeezed lemon juice when possible; bottled varieties can lack vibrancy and are often overly processed.
- 1/8 tsp cayenne. A dash of cayenne pepper introduces a gentle heat that rounds out our aioli beautifully without overpowering it. This small addition complements the garlic while adding warmth on the palate—a delightful surprise! If you’re looking for less heat but still want some spice, feel free to replace cayenne with paprika for color without too much bite.
Equipment You’ll Need:
Before we jump into making our Garlic Aioli Recipe, let’s ensure we have all our trusty tools lined up—after all, having the right equipment makes cooking smoother and more enjoyable!
- Mixing bowl – A medium-sized mixing bowl is essential for combining all your ingredients seamlessly together. It should be deep enough to allow for whisking without splattering any precious aioli goodness around your kitchen!
- Whisk or fork – While some might reach for an electric mixer for convenience, I find whisking by hand allows me to connect more intimately with my food as I blend everything together energetically! Plus, there’s something profoundly satisfying about seeing those ingredients transform before your eyes.
- Garlic press or knife – For mincing garlic efficiently and effectively! If using a knife, be sure to chop finely so that those tiny pieces disperse evenly throughout your aioli—this ensures every bite bursts with garlicky goodness.
- Zester or juicer – To extract every drop from your lemons without any seeds sneaking into your mixture! A zester also works wonderfully if you’re considering adding lemon zest for an extra citrusy punch.
Now that we have everything set up—and trust me when I say you’re going to love how easy this comes together—let’s dive into preparing our Garlic Aioli Recipe!
Step 1: Combine Your Creamy Base
Start by placing half a cup of mayonnaise into your mixing bowl. As you spoon it in, take a moment to appreciate its velvety texture—it feels luxurious against your fingers! Next comes one large clove of minced garlic; don’t skimp on this step because it’s where all those aromatic flavors begin to meld together beautifully. Use either a knife or garlic press to achieve finely minced pieces since they’ll integrate better into the mayo base than larger chunks would.
Step 2: Add Flavorful Enhancers
Now it’s time to introduce our flavor boosters: half a teaspoon of stone ground mustard followed by two teaspoons of fresh lemon juice and an eighth teaspoon of cayenne pepper! As you sprinkle them in one by one into the bowl—notice how vibrant they look against the creamy backdrop? That visual contrast excites not only your eyes but also hints at harmonious flavor combinations about to unfold within this humble mix.
Step 3: Whisk Until Smooth
Using your whisk (or fork), vigorously mix these components until they come together in perfect harmony! Don’t rush through this step; take pleasure in watching as individual elements blend seamlessly into one cohesive sauce—a true testament to culinary magic at work! You’re aiming for smoothness here—a rich consistency without lumps is what we want… so keep whisking until everything looks well incorporated!
Step 4: Taste & Adjust
Once you’ve achieved that beautiful smoothness—a vital component indeed—it’s time for my favorite part: tasting! Dip a crisp vegetable stick or piece of bread into your freshly made aioli and take note of its flavor profile before chilling it in the refrigerator until serving time arrives. Feel free at this stage to adjust seasoning according to personal preference; perhaps another squeeze of lemon juice? Or maybe just an extra pinch more cayenne if you’re feeling adventurous? Trust me on this—you’ll want every bite bursting with deliciousness!
As we continue through these steps together toward creating perfection in each dollop served alongside roasted veggies or sandwiches galore—you’ll find joy in learning not only how simple making homemade condiments can be but also how profoundly satisfying each preparation becomes along our journey in cooking!
Garlic Aioli Recipe: Your New Favorite Condiment
I’ve always been captivated by the allure of a good aioli. That creamy, dreamy sauce that can elevate even the simplest of dishes into something truly extraordinary. And when it comes to garlic aioli, we’re talking about a symphony of flavors that dances on your palate and makes everything from crisp veggies to grilled meats sing with joy. I promise you, once you experience the rich, garlicky goodness of this aioli recipe, you’ll want it in your fridge at all times. Let’s dive right into making this delectable condiment!
Step 5: Mixing the Ingredients Together
To begin crafting your garlic aioli, you’ll first want to gather your ingredients: 1/2 cup of mayonnaise, 1 large clove of garlic (minced), 1/2 teaspoon of stone ground mustard, 2 teaspoons of fresh lemon juice, and just a pinch—1/8 teaspoon—of cayenne pepper. Start by placing the mayonnaise in a medium-sized mixing bowl; its creamy texture is the perfect base for our flavorful concoction. The mayonnaise acts as an emulsifier here, bringing everything together smoothly and creating that luscious texture we crave in an aioli.
Next, add the minced garlic to the bowl. This step is crucial because garlic not only lends its aromatic essence but also infuses each bite with a punch of flavor that’s utterly intoxicating. Use the back of your knife to press into the minced garlic a bit more if you want to release even more oils and flavor; trust me on this one! Then sprinkle in the stone ground mustard—it adds a delightful tang that balances the richness of the mayo beautifully. Follow this with fresh lemon juice; its acidity brightens up the sauce and balances out the savory elements perfectly. Finally, add that hint of cayenne pepper; it’s just enough to give a gentle kick without overwhelming the other flavors.
Step 6: Whisking It All Together
Now comes one of my favorite parts: whisking everything together! Grab your trusty whisk (or even a fork if that’s what you have on hand) and start mixing vigorously until all those ingredients are beautifully combined into a smooth, creamy blend. You should see it transform before your eyes into this golden-hued sauce that practically shimmers with deliciousness! While whisking, pay attention to how it thickens ever so slightly—that’s exactly what we want. The emulsification is key here; it allows all those individual flavors to meld together harmoniously rather than remaining separate entities in your bowl.
Take a moment to appreciate how simple yet powerful this step is! When done correctly, whisking not only combines flavors but creates air pockets that lighten up the texture of your aioli, making it spreadable and delightfully fluffy. If you notice any lumps or if it’s not coming together well—don’t worry! Just keep whisking; sometimes it takes a little extra love to achieve that velvety smoothness we’re after.
Step 7: Tasting and Adjusting Flavors
Once you’ve achieved that beautiful consistency, it’s time for my favorite part—tasting! Scoop out a small amount with a spoon and give it a try. This is absolutely paramount because every palate is different; perhaps you like things extra zesty or with just a hint more heat from that cayenne. If you feel like it needs more brightness, another tiny splash of lemon juice can do wonders! Or if you’re craving more depth, consider adding another smidgen of mustard—the possibilities are endless.
This step isn’t just about confirming flavor; it’s also about connection—finding that perfect balance that reflects your personal taste buds while still embracing those classic elements of traditional aioli. Don’t be shy here! Adjustments are part of the process; after all, cooking is as much about exploration as it is about following recipes. Remember to jot down any tweaks you make so you can recreate this magic next time!
Step 8: Chill Out for Maximum Flavor
Now comes an essential step that many might overlook: chilling your garlic aioli in the refrigerator before serving! Why chill? Well, allowing your aioli some time in the fridge does magical things—it lets all those vibrant flavors meld together even further, creating an utterly harmonious blend that’s profoundly satisfying when served cold or at room temperature.
Transfer your beautiful creation into an airtight container or simply cover your mixing bowl tightly with plastic wrap. Place it in the refrigerator for at least 30 minutes but ideally for an hour or two if you can resist diving right in! While waiting can be torturous (trust me—I know!), I encourage you to embrace this patience as part of the culinary journey you’re on. During this resting phase, those flavors develop complexity and depth—a transformation akin to letting fine wine breathe or allowing dough to rise.
Final Touches
As we wrap up our garlic aioli adventure, let’s talk about presentation and serving suggestions because what good is such an exquisite sauce without showcasing it properly?
Step 9: Serving Suggestions
When you’re ready to serve this divine garlic aioli recipe—and I know you’ll be itching for that moment—take care in how you present it! A simple ceramic bowl or even a small mason jar can elevate its charm on any table setting. Surround it with vibrant vegetables—think crunchy carrots, refreshing cucumbers, or juicy bell peppers—that invite people to dip away wholeheartedly.
This sauce isn’t just limited to veggies though; consider using it as a dressing for sandwiches or wraps where each bite brings forth waves of flavor dancing through layers of fresh ingredients. Even grilled chicken or fish benefits immensely from this creamy companion—it truly enhances every dish it’s paired with!
In conclusion, I hope this journey through my beloved garlic aioli recipe inspires you as much as it has inspired me over countless gatherings with family and friends. As they dip their veggies into that silky goodness or slather it onto their sandwiches, you’ll witness firsthand how joyous food can create connections among people around any table. Remember—cooking is not merely about nourishment but sharing love through every bite we take together! Enjoy every moment spent creating this delightful condiment—you deserve every bit of deliciousness life has to offer!
Storage and Enjoyment Tips for Your Garlic Aioli Recipe
Now that your Garlic Aioli is ready, the excitement doesn’t have to end! This creamy, garlicky delight is the perfect companion for so many delicious meals and snacks, and trust me, you’ll want to savor every last drop. Whether you’re dipping fresh veggies into it or slathering it onto a sandwich, this Garlic Aioli Recipe is bound to elevate your food experiences. And if you find yourself with some leftover aioli (though it’s tough to resist!), I’ve got all the tips you need to keep it fresh and flavorful for future enjoyment.
Storing Leftover Garlic Aioli Recipe
To store your leftover Garlic Aioli, simply transfer it into an airtight container. Glass jars work beautifully here—not only do they keep the aioli safe from air exposure, but they also allow you to see that luscious dip waiting for you in the fridge! You can expect your homemade garlic concoction to stay fresh for about 4 to 5 days when stored properly in the refrigerator. One little trick I’ve learned over the years is to place a slice of bread in the container alongside your aioli; this helps absorb excess moisture and keeps it from becoming watery. After a few days, you might notice that it develops even deeper flavors as the garlic infuses into the mayonnaise. I promise you; the slight tanginess from the lemon juice perfectly melds with that rich creaminess—it’s truly a taste experience worth waiting for. When you’re ready to enjoy it again, there’s no need for reheating; just give it a quick stir and serve!
Freezing Garlic Aioli for Later
Now, if you’re looking to save some of that heavenly Garlic Aioli for a later date—and trust me, you’ll want to—freezing is an excellent option! To freeze your aioli properly, simply spoon it into an ice cube tray or silicone molds. Cover them with plastic wrap or place them in a freezer-safe bag once they’re frozen solid. This method allows you to pop out just what you need without defrosting the entire batch. Your garlic aioli will keep well in the freezer for up to 3 months! How convenient is that? Picture this: on a busy weeknight when you’re craving something special but short on time, just grab a couple of those frozen cubes and let them thaw while you prepare your meal. You’ll have instant gourmet flavor at your fingertips whenever inspiration strikes!
Garlic Aioli
Whip up this easy Garlic Aioli Recipe in just minutes! Perfect for dipping veggies or enhancing sandwiches—try it today!
- Prep Time: 10 minutes
- Cook Time: N/A
- Total Time: 0 hours
- Yield: Approximately 8 servings 1x
- Category: Condiment
- Method: Mixing
- Cuisine: Mediterranean/American
Ingredients
- 1/2 cup mayonnaise
- 1 large garlic clove (minced)
- 1/2 tsp stone ground mustard
- 2 tsp fresh lemon juice
- 1/8 tsp cayenne pepper
Instructions
- In a medium bowl, combine the mayonnaise and minced garlic.
- Add the stone ground mustard, lemon juice, and cayenne pepper to the bowl.
- Whisk all ingredients together until smooth and well blended.
- Taste the aioli and adjust seasoning if necessary by adding more lemon juice or cayenne according to your preference.
- Cover and refrigerate for at least 30 minutes before serving to enhance the flavors.
Nutrition
- Serving Size: 30g
- Calories: 100
- Sugar: 0g
- Sodium: 75mg
- Fat: 10g
- Saturated Fat: 1g
- Unsaturated Fat: 8g
- Trans Fat: 0g
- Carbohydrates: 2g
- Fiber: 0g
- Protein: 0g
- Cholesterol: 5mg